Pages

Monday, 25 February 2013

Rice Noodles with Chicken & Vegetables

Rice noodles with chicken and vegetables

I know next to nothing about Filipino food, but I have prepared this Filipino dish many times over the past year and it is seriously delicious. In fact, I must confess that my husband and I polish off a whole platter of this between the two of us in just one sitting. That’s how much we like it.

The recipe comes from a cookbook called Extending the Table: a world community cookbook, which was given to me by one of my daughters and her husband. It’s a wonderful resource put together by the Mennonite Central Committee. In among the recipes from around the world are stories about the people behind the recipes and inspirational perspectives on the role food and community play in our lives.

In the Philippine community, this dish is known as pancit bihon, which means rice noodles. This recipe calls for adding the uncooked rice noodles directly to the pan. This is what I do. It is a bit messy. To avoid the mess and the excitement of the threadlike noodles scattering themselves across your stove top, you can soak the rice noodles in warm water for ten minutes or so and then cut them into smaller pieces before adding them to the dish. I’ve only used rice noodles, but regular vermicelli could be used although you will want to precook it before adding it to the dish. 

Additionally, you could substitute pork for the chicken; add shrimps if you like; and use whatever vegetables you have on hand in place of those in the recipe, increasing the amounts of veg and meat if you want. In the original recipe, the hard-cooked eggs, green onions and lemon slices are given as a garnish. I recommend including them with the dish. They look wonderful and taste even better!

MA’s Pancit Bihon

Pancit Bihon ingredients
2 tbsp cooking oil
2 cloves garlic, minced
1 large onion, finely chopped
1 cup cooked chicken, chopped
3 tsp fish sauce
2 cups chicken broth
½ tsp salt
¼ tsp pepper
1 cup carrot, diced
1 cup green beans, cut into 1” pieces
1 cup cabbage, coarsely shredded
8 oz rice noodles
2 eggs, hard-cooked and chopped
2 green onions, diced
1 or 2 lemons, sliced

Cooking the rice noodles
In a large frying pan, heat cooking oil over medium heat. Add garlic and onion and sauté until just softened.

Add cooked chicken, fish sauce, chicken broth, carrots, beans, cabbage, salt and pepper. Simmer for 10 minutes or until vegetables begin to soften.

Add rice noodles and cook 5 to 8 minutes or until noodles are tender. Add more broth or water as needed if mixture is too dry to cook the noodles.

Place noodle mixture on a large platter. Garnish with eggs, green onions and lemon slices.


Thursday, 21 February 2013

Pork Medallions in Mustard Sauce

Tender pork medallions in rich mustard sauce garnished with fresh green grapes

I’ve been working on a post about the best oatmeal cookie recipe and was hoping to have it ready to go this week. It’s turning out to be a history lesson for me as I am finding out that recipes can evolve over many decades. Meanwhile, here is a fully evolved recipe for a main dish that has drawn rave reviews at my table for, well, decades. It’s dedicated to the family and friends I’ve shared it with over the years.

This recipe originated in a special Christmas edition of Canadian Living magazine from 1985. (I think Canadian Living is still one of the best magazines out there and I especially like their recipes.) I’ve made minimal changes to this recipe. 

You will have to fuss a bit to make the pork medallions. However, you can prepare the dish a day ahead and do the final cooking the next day. Stick with the Dijon, as regular mustard doesn’t deliver the same subtle flavour. And, don’t forget the green grapes. They are just so good with the rich, creamy mustard sauce. Serve this with brown rice and steamed green beans, and get ready for the compliments.

MA’s Pork Medallions in Mustard Sauce


Preheat oven to 350º F.

For the meat:
2.5 lbs pork tenderloin
¼ cup flour
½ tsp salt
¼ tsp white pepper
2 tbsp butter
2 tbsp olive oil

For the sauce: 
¼ cup butter
1 clove garlic, halved
¼ cup flour
¼ cup Dijon mustard
1 cup milk (I use skim)
½ cup dry white wine
½ tsp salt
½ tsp dried basil
½ cup light cream

For the garnish:
1 ½ cups seedless green grapes, washed and dried 

Making the medallions
Cut pork tenderloin into ¾” thick slices. 

Using a mallet or the edge of a heavy bottle, pound each piece of pork to flatten it slightly.

Combine flour, salt and pepper; dredge pork in flour mixture.

In large frying pan, heat butter and oil over medium heat.

Saute until golden


Sauté pork for about 5 minutes each side or until golden on both sides. Do this in batches so that the meat is not crowded while it sautés.

In a shallow baking dish, arrange pork in a single layer. Cover with foil to keep warm.


Whisk together sauce ingredients

In a saucepan, melt butter.

Cook garlic in butter for 2 minutes, and then remove garlic from pan.

Stir in flour to make a smooth paste.

Add mustard and stir with love until the mixture bubbles.


Whisk in milk, wine, salt and basil. Cook stirring constantly for about 1 minutes or until the mixture is bubbly and has thickened.

Remove from heat and whisk in the cream.

Pour sauce over pork.

(The recipe can be prepared ahead up to this point, then covered and refrigerated for up to 1 day. Add about 15 minutes baking time when you reheat it.)

Cover the baking dish with a lid or foil and cook for 25 to 30 minutes or until pork is tender.
Transfer pork and sauce to a warm serving platter.

Garnish with green grapes and serve.

Makes 6 to 8 servings. 

Saturday, 16 February 2013

Pork Chops with Port Glazed Mushrooms


Pork Chops with Port Glazed Mushrooms


The liquor cupboard in my house is a mishmash of opened and unopened bottles of all shapes and sizes. While the red wine bottles tend to change more frequently, most of the others are dusted off only occasionally. Earlier this week I visited the cupboard looking for something to glaze a beautiful bounty of button mushrooms. What I know about wine is sadly limited, but I knew from past cooking experience that marsala went well with mushrooms. I had no marsala, not even any sherry, and so I reached for the bottle of white port (how it arrived at our house I cannot recall). It was a delicious default decision.

This main dish is simple to prepare and cooks up quickly on the stovetop. The mushrooms are sautéed dry, that is, without oil, to draw the moisture out of them. The residual mushroom “juice” is boiled away, and then butter is added to brown the mushrooms. Finally, the port is poured in and reduced down to a flavorsome glaze. The mushrooms on their own make a scrumptious side dish or you can pair them with chicken breasts instead of pork chops for an equally easy and elegant main dish.

MA's Pork Chops with Port Glazed Mushrooms


4 boneless pork loin chops
½ onion, finely diced
1 lb fresh button mushrooms, cut into thick slices
4 tbsp butter, divided into 1 tbsp and 3 tbsp
1/3 cup Port (white)
Pinch of dry thyme leaves

In a large frying pan, melt 1 tbsp butter over medium high heat.

Add onions and sauté for 2 to 3 minutes or until onions are softened.

Add chops to pan and sauté on medium heat for about 5 minutes; turn chops over and sauté 5 minutes more.

Remove chops from frying pan and keep warm.

Place mushrooms in dry pan
Remove onions from frying pan, keeping separate from chops.

With frying pan on high heat, put in all the mushrooms and stir well with love. 

Reduce the heat to medium high and keep stirring often.


Moisture is released from mushrooms

After a few minutes, moisture will begin to escape from the mushrooms.

Continue stirring the mushrooms until most of the liquid has evaporated, then add 3 tbsp butter, sautéed onions and thyme. Stir to combine.

Sauté on medium high heat until the mushrooms begin to brown.

Add the Port to the pan and toss to coat the mushrooms well. Increase the heat to high and let boil vigorously until the Port has reduced in volume by about half. 
Almost ready to serve


Return the chops to the pan and cook on medium heat for 5 to 7 minutes. 

Wednesday, 13 February 2013

Banana Love: Good Ol' Banana Bread

Fragrant and Delicious: My Go To Banana Bread


You know I love bananas (see my previous posts for Blender Banana Layer Cake and Earthquake Banana Cream Pie). I also love sharing, and this recipe makes enough banana bread to share with your favourite people.

I’ve adapted this recipe a little over the years, but the basics come from one of the first cookbooks I bought myself as a young bride in the early 70s. The cookbook is Mmmmm: A Feastiary by Ruth Reichl.

A much loved cookbook
The book’s been like a friend to me. I still turn to it for inspiration, re-reading the recipes and the stories and enjoying the original sketches (where else can you see a corn cob playing apple notes on a peapod flute?) and sweet, offbeat photographs like the life-size quilted chicken adorning the chicken fricassee recipe. While our friendship is strong, Mmmmm’s pages are now fragile: edges yellowed, a little tattered, a little torn, some splattered with sauce and a growing number of them permanently adrift from their paperback mooring. Don’t worry, old friend, I will hold you together until destiny us do part.

You might wonder why I never replaced this beloved cookbook of mine. Well, I got to wondering that, too. After all, I’ve replaced my Joy of Cooking several times. So I googled Ruth Reichl this morning and found out that she’d gone on to great things in the world of food: writing, editing, lecturing and winning awards (you can read the details and get a few recipes at ruthreichl.com.) FYI - if you check out Mmmmm on Amazon, there are currently two new copies available starting at $558 and a handful of used copies from $35 and up.

Now, one more thing before we head for the kitchen … in Ms Reichl’s original intro to the recipe she writes “I like to bake the bread in a lot of old coffee cans so that it seems like more.” If you try baking the bread in a variety of containers, butter them up really well first and fill each about 2/3 with batter. And remember to share some slices with a friend.


MA’s Go To Banana Bread

Preheat oven to 350º F.
Grease pans.
Getting dry ingredients ready
2 ½ cups flour
2 cups sugar (use all white or 1 ½ cup white and ½ cup brown)
1 tsp salt
2 tsp baking soda
½ tsp nutmeg
1 tsp cinnamon
1 cup butter
4 bananas, ugly ripe
4 eggs
2 tsp vanilla

In a large bowl, mix together the dry ingredients: flour, sugar, salt, baking soda and spices.
For the blender: ugly bananas and all

In a blender, place butter, bananas, eggs and vanilla. Mix until well blended.


Add wet ingredients to the dry and stir with love until well blended.

Ready to bake


Pour into prepared pans. Makes 6 cups of batter, which is enough for two 6”x 3 ½” loaf pans and one 9” x 13” loaf pan.

Bake for 35 to 45 minutes. Test for doneness with cake tester or wooden skewer.

Remove from pans and cool on rack.

Keeps well in refrigerator for several days or you can wrap and freeze for future enjoyment.


Printable Recipe for MA's Go To Banana Bread

Wednesday, 6 February 2013

To snap or not to snap?


Ginger Cookies

No, this isn’t a post about irritability vs. patience or the really cold weather we’ve had here lately or even the inaccurately named shelled creatures that are quickly running out of natural habitat because they are indeed too slow. No, it’s just my attempt at a snappy headline to introduce this recipe for ginger cookies. Of course, the above photo was a huge clue, right?

This particular batch of ginger cookies was baked so I could crumble them to make a crust for a pumpkin cheesecake. Luckily, this recipe makes a lot of cookies and there were plenty to munch on after making the crust. The recipe is adapted from one of my favourite cookbooks, The Joy of Cooking.

Now, let’s snap back to the question of the day … do you want a ginger cookie with snap or no snap? With this recipe, you can have both. It all depends on how long you bake the dough. For snap, overbake slightly; for a more tender cookie, underbake a bit. In the above photo, the snaps are the darker coloured cookies on the top layer; the chewier ginger cookies are the lighter coloured ones on the bottom layer.

If you’ve only had gingersnaps from the grocery store, try making your own ginger cookies. The taste is superior and you can decide on the texture. You might have all the ingredients in your pantry right now. Your kitchen will smell wonderful and your cookie craving will be well satisfied. What are you waiting for? Snap to it. (Or not.)

MA’s Ginger Cookies

Preheat oven to 350º F.
The dry ingredients
3 3/4 cups flour
1 ½ tsp baking powder
½ tsp baking soda
4 tsp ground ginger
1 tsp ground cinnamon
¼ tsp ground cloves
¼ tsp salt
1 ¾ cups butter, softened
1 2/3 cups sugar
2 eggs
½ cup molasses
2 tsp lemon juice
¼ tsp grated lemon zest


Cream butter and sugar
In a mixing bowl, whisk together dry ingredients.

In a mixing bowl or in a Kitchen Aid mixer, cream butter and sugar until well blended.
Add eggs, molasses, juice & zest


Add eggs, molasses, juice and zest to butter/sugar mixture and mix until everything is combined.


Add the dry ingredients and mix until well blended.
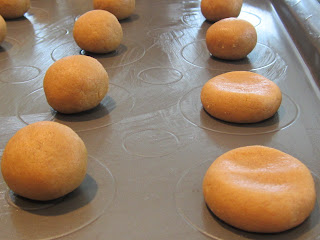
Roll it and pat it


Pinch off pieces of dough and roll each into 1” balls. Place balls about 1 ½ inches apart on lightly greased cookie sheets. Pat each ball down slightly.


Bake, one sheet at a time – about 10 minutes for a tender, chewy cookie, about 13 to 15 minutes for a snappy, crunchy cookie.


Remove cookies sheet to rack and let stand a few minutes until the cookies firm slightly.
Transfer cookies to racks to cool.

Printable Recipe for MA's Ginger Cookies


Sunday, 3 February 2013

Baked Beans with Apples


Baked Beans with Apples - so good!


This post goes out to my nephew Adam who really enjoys these baked beans.

This is another recipe inspired by Mme Benoit. The original is found in her Cooks at Home book, published in 1987. It is a true French Canadian recipe featuring maple syrup and was passed down through five generations of her family. Never one to be bound by tradition, I’ve made some changes: substituting bacon for the original salt pork and brown rice syrup for the maple syrup (because that’s what I had on hand), adding some molasses, and omitting the optional half cup of rum poured over the apples just before serving. Burying the mustard-covered onion in the beans is part of Mme Benoit’s original instruction. And yes, you can eat the onion when the beans are all baked. It’s mushy good by then.

About the pre-cooked beans: I began by using the Short Soak Stove Top Beans method described in an earlier post. If you follow that post, remember to double the amounts to get the measure of pre-cooked beans needed for this recipe and keep the cooking water, because you will use it in this recipe. If you use another method to pre-cook the beans or want to use canned beans instead, you will need 12 cups of pre-cooked beans and you will need to add enough water to just cover the beans.

About the brown rice syrup: Brown rice syrup is about half as sweet as sugar. It’s said to offer some health benefits over some other sweeteners and that’s how it wound up in my pantry. Last year, there was a lot of controversy about arsenic in brown rice syrup. After looking into the brand of brown rice syrup I have been using from Lundberg Family Farms, I am satisfied with the safety of their products. If you are interested, you can check them here. What’s really surprising to me in the whole debate is that neither Canada nor the US set limits on the levels of arsenic in foods. If you are interested in the issue, the University of Guelph Food Safety Network is a good place to start your reading.

About the maple syrup: Of course, good old Canadian maple syrup is authentic, tasty and has health benefits, too, and you can check them out here.

All that being said, whether you use brown rice syrup or maple syrup, I hope you will try making these delicious baked beans with apples. They go great with a cooked ham and a crowd of hungry people. Just ask Adam.


Baked Beans with Apples

Get ready for the bean pot
Preheat oven to 325º F.

4 cups dried navy beans, pre-cooked to make about 12 cups, and the water in which they were cooked (I used my Short Soak Stove Top Beans method)

4 strips of bacon to line pan

½ lb bacon, chopped

1 large onion, peeled and sliced in half

1 tsp dry mustard

1 cup brown rice syrup or maple syrup
Bacon strips to line pan

1 tbsp coarse salt

½ cup molasses

2 to 4 apples, well washed, unpeeled, cored and sliced

1 cup brown sugar

½ cup butter

Line a large, deep baking pan with bacon strips.

Place the pre-cooked beans and their cooking water on top of the bacon strips.
Burying the onions

Mix in the chopped bacon.

Cover the onion halves in dry mustard until all of the mustard sticks to them. Bury the onion halves in the middle of the beans.

Add the syrup and molasses to the beans.

Sprinkle the coarse salt over the beans.

Cover and bake for 3 hours. Remove from oven and stir beans gently. If they are getting dry, slowly add hot water to them.

Cover and return to oven for 1 hour.
Topped with apples, brown sugar and butter

Meanwhile, prepare the apples for the topping and cream together the brown sugar and butter.
Remove beans from oven and uncover. Place the apple slices on top of the beans, as close together as possible. Spread with sugar and butter mixture.

Return to the oven, uncovered, for 1 hour.

Serve some of the apples with each portion of beans.

Makes about 12 to 14 servings.


Printable Recipe for MA's Baked Beans with Apples

Dig into baked beans with apples

Friday, 1 February 2013

A Quick Soak for Dry Beans


Who has time to cook with dried beans?

Apparently, I do. (And maybe you do, too.)

And, why would you want to go through the trouble when you can open a can?

All beans are nutritional goldmines bringing you beneficial dietary fibre, low fat protein, vitamins, minerals and no cholesterol. But cooking your own beans rather than opting for a can gives you a healthy edge because, like any scratch cooking, you’ve got control. Canned beans are high in sodium. Start with dry beans and you’re in charge of how much salt is added. Canned beans can have a shelf life of up to five years and that means they have preservatives added and/or the can has a white plastic lining. That lining may contain Bisphenol A, which may or may not lead to cancer or reproductive problems. Start with dry beans and you don’t have to worry about that – or recycling the can.

Dried beans are economical, too, usually about half the price of canned beans. One pound of dry beans will give you about six cups of cooked beans. You’d need about four 15-ounce cans of beans to get six cups of cooked beans. So even with a good sale on canned beans (which we don’t want anyway, right?) the dried beans will be cheaper.

And one last reason to try cooking beans from scratch … their taste and texture will be better than canned.

There are many ways to take beans from dried to cooked. Search “quick cooking beans” and you can see for yourself the length and breadth of the dried bean debate. The method I’m going to describe is taken primarily from one of my cooking heroines, Mme Jehane Benoit, and is rewritten here to be a little easier to follow. Now the “quick” does not mean “instant.” We’re simply cutting the soaking time. You’ll still need to give yourself a few hours to turn the dehydrated legumes into succulent little morsels.

Once you have transformed the dry beans into cooked beans, you can use them any number of ways: soups, salads, casseroles, maybe even the Baked Beans with Apples I’ll be posting next. You can also freeze the cooked beans for future use.

MA’s Short Soak Stove Top Beans


1 lb (about 2 cups) dried beans – any kind, except split green or yellow peas or black-eyed peas, which should not be soaked and consequently not used for this method (Navy beans are shown in this post.)

8 cups rapidly boiling water

1 tbsp molasses

Pick through the dried beans. The surface of the bean should be smooth, firm, and uniform in size and color. Remove any beans that are broken, blistered looking, wrinkled or shriveled. Take out any tiny stones or dirt. Wash beans in cold water. Remove any floaters, as they will not cook properly.

Place beans in a large pot.

Cover the beans with the boiling water. Add molasses.

Cover and let stand for one hour.

Foam forming on top of beans
Uncover and bring to a rapid boil in the same water for 2 to 3 minutes.

You may get some foam gathering on top of the water as the beans cook. Skim off the foam. You can minimize heavy foaming by adding 2 tbsp of butter or oil to the beans.


Cooked and ready to use
Cover and lower the heat. Simmer for about 1 ½ hours or until the beans are starting to become tender.

IF the beans are going to be used in another dish in which they will cook further, such as baked beans, stop here and add the ingredients needed for the dish, then continue cooking.

IF the beans are going to be used in a dish without further cooking, such as in a salad, keep them simmering until they have reached the firmness/mushiness you prefer.

IF you don’t know how you are going to use the beans, continue simmering until they have reached the firmness/mushiness you want. You can always cut down on the cooking time if they end up in a recipe where they’ll be cooked further.

Either way, cook slowly and test the beans often to see how they’re doing.

Printable Recipe for MA's Short Soak Stove Top Beans