Pages

Showing posts with label cookies. Show all posts

Wednesday, 3 April 2013

Chocolate Pretzel Chip Cookies from Keeley in the Kitchen


Up close with Keeley's Chocolate Pretzel Chip Cookies

I mentioned that my daughter Keeley and I spent a lot of time together in the kitchen during spring break. After making the cookies for the dogs, we made these chocolate pretzel chip cookies for the humans. (To be perfectly honest, Keeley made the cookies and I took photos.)

This recipe is based on a chocolate chip cookie recipe from the Our Favourite Recipes Cookbook put together by St. Mary’s Academy Mother’s Guild in 1984. (St. Mary’s Academy is a Catholic girls school in Winnipeg, Manitoba. Both our daughters were students there for a time.) It’s a good basic recipe for chocolate chip cookies (daughter Darcy says it’s the best) and we’ve adapted it here to make room for Keeley’s idea: adding chocolate-covered pretzels. And a good idea it is!

Without further delay, here’s the recipe. FYI – these won’t last long!


Keeley’s Chocolate Pretzel Chip Cookies


Preheat oven to 350º F.
Lightly grease cookie sheets.

Getting ready to make cookies

1 cup softened butter, unsalted preferred

1 cup brown sugar

1 tsp vanilla

2 eggs, beaten

2 ½ cups flour

½ tsp salt

1 tsp baking soda

½ cup semi-sweet chocolate chips

Cutting pretzels into pieces
1 cup chocolate-covered pretzels, cut into pieces


In a large bowl or the bowl of a Kitchen Aid stand mixer, cream together the butter and brown sugar.

Add vanilla and eggs to butter/sugar mixture and beat until combined.

Sift together the flour, salt and soda. Add to the batter and blend all ingredients well.

Fold in the chocolate chips and pretzel pieces.
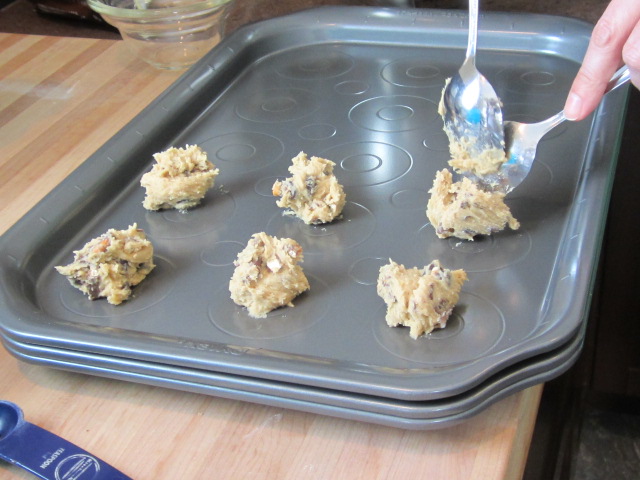


Drop by spoonfuls
Drop by spoonfuls onto cookie sheets. You can strategically place a piece of pretzel on top of each cookie at this point.


Bake for 10 minutes.


Makes about 4 dozen cookies.


These disappeared quickly!

Monday, 1 April 2013

Pumpkin Dog Cookies from Keeley in the Kitchen


Stashu enjoys a pumpkin dog cookie
Spring break brought some special visitors to our house: my daughter Keeley, her husband Arthur and their dogs Fletcher and Allie. It’s always a pleasure to welcome them and I enjoyed having Keeley’s company in the kitchen.

Keeley in the kitchen
Among the many things we cooked together were these pumpkin cookies for the dogs. Most dog owners will be familiar with the wonders of pumpkin in remedying canine constipation as well as canine diarrhea. Explaining this apparent paradox is well beyond my knowledge base although I think it’s safe to say that pumpkin is generally a good thing for doggy digestion. (Also, if either of these ailments is a serious or long-term problem for your pet, promise me you’ll get him or her to the vet pronto.)

Making your own pet treats is a great idea, of course, because you get to control what’s in them. It’s not something I do for my dog Stashu on a regular basis, so for him it’s a nice change from a store-bought biscuit. He really enjoyed these pumpkin cookies, as did Fletcher and Allie.

Keeley found this recipe on Pinterest and we tweaked it just a bit: doubling the amount and finding the right measure of canned pumpkin to make the dough stiff but pliable. (If you are not familiar with pinterest.com, consider this your introduction and be warned that you may find it mildly addictive.)

Fletcher likes his pumpkin treat
You can cut the cookies into whatever shape you like, even scoring the dough into squares will work, or dig out those bone-shaped cookie cutters. I don’t seem to have any of those since I purged my cutter collection, so we went with rounds and the dogs didn’t mind a bit.

We hope you will try making this recipe for your furry companions. Send me a photo of your pet enjoying his or her pumpkin cookies and I’ll share it here on the blog.


Keeley’s Pumpkin Dog Cookies


 Preheat oven to 350º F.
 Cover baking sheets with parchment paper.


Ingredients for pumpkin dog cookies
4 eggs

1 ½ cup pumpkin puree

4 tbsp skim milk powder

½ tsp sea salt

2 tsp dried parsley

5 cups rice flour


Mixing in the ingredients
In a large bowl or the bowl of a Kitchen Aid stand mixer, beat together eggs and pumpkin.

Stir in the milk powder, salt and parsley until well mixed.

Gradually add rice flour – about a cup at a time – and mix until all the ingredients are well blended. The dough will be quite stiff, but if it is unmixable, add a little more pumpkin puree or water so that everything combines well. It will be like a shortbread dough looking a little dried out and cracking here and there.


Rolling the dough on a sunny afternoon


Roll the dough to about ½-inch thickness and cut into desired shapes.


Bake for 20 minutes.


Remove from oven and let cool completely before storing (or sharing with your pets).

Makes approximately 4 ½ dozen 1 ½” rounds and 2 ½ dozen 2” rounds.


Who's a good boy?


Wednesday, 6 February 2013

To snap or not to snap?


Ginger Cookies

No, this isn’t a post about irritability vs. patience or the really cold weather we’ve had here lately or even the inaccurately named shelled creatures that are quickly running out of natural habitat because they are indeed too slow. No, it’s just my attempt at a snappy headline to introduce this recipe for ginger cookies. Of course, the above photo was a huge clue, right?

This particular batch of ginger cookies was baked so I could crumble them to make a crust for a pumpkin cheesecake. Luckily, this recipe makes a lot of cookies and there were plenty to munch on after making the crust. The recipe is adapted from one of my favourite cookbooks, The Joy of Cooking.

Now, let’s snap back to the question of the day … do you want a ginger cookie with snap or no snap? With this recipe, you can have both. It all depends on how long you bake the dough. For snap, overbake slightly; for a more tender cookie, underbake a bit. In the above photo, the snaps are the darker coloured cookies on the top layer; the chewier ginger cookies are the lighter coloured ones on the bottom layer.

If you’ve only had gingersnaps from the grocery store, try making your own ginger cookies. The taste is superior and you can decide on the texture. You might have all the ingredients in your pantry right now. Your kitchen will smell wonderful and your cookie craving will be well satisfied. What are you waiting for? Snap to it. (Or not.)

MA’s Ginger Cookies

Preheat oven to 350º F.
The dry ingredients
3 3/4 cups flour
1 ½ tsp baking powder
½ tsp baking soda
4 tsp ground ginger
1 tsp ground cinnamon
¼ tsp ground cloves
¼ tsp salt
1 ¾ cups butter, softened
1 2/3 cups sugar
2 eggs
½ cup molasses
2 tsp lemon juice
¼ tsp grated lemon zest


Cream butter and sugar
In a mixing bowl, whisk together dry ingredients.

In a mixing bowl or in a Kitchen Aid mixer, cream butter and sugar until well blended.
Add eggs, molasses, juice & zest


Add eggs, molasses, juice and zest to butter/sugar mixture and mix until everything is combined.


Add the dry ingredients and mix until well blended.
Roll it and pat it


Pinch off pieces of dough and roll each into 1” balls. Place balls about 1 ½ inches apart on lightly greased cookie sheets. Pat each ball down slightly.


Bake, one sheet at a time – about 10 minutes for a tender, chewy cookie, about 13 to 15 minutes for a snappy, crunchy cookie.


Remove cookies sheet to rack and let stand a few minutes until the cookies firm slightly.
Transfer cookies to racks to cool.

Printable Recipe for MA's Ginger Cookies


Monday, 24 December 2012

Season's Greetings from MA in the Kitchen

I'll be busy in my kitchen over the next few days as I am sure many of you will be. I still want to make a batch or two cookies, my homemade cranberry sauce and put the marzipan icing on the fruit cake (no fruit cake groans, please. This buttery white fruit cake filled with cherries and raisins and almonds is from a family recipe and, if you're good, I'll share it with you in time for next Christmas).

Tonight we'll be enjoying all kinds of appetizers - like sweet and sour meatballs, little quiches, tapenade and baguettes, and some purchased goodies to round out the fare. Since we are doing the big turkey dinner on Boxing Day, tomorrow we'll be having a make your own pizza dinner. That will be fun. The main event on Wednesday will feature turkey and all the trimmings. It'll be great especially because it will be shared with those near and dear to my heart.

Before I head for the kitchen, here's a last minute Christmas gift for you, a recipe for Coconut Macaroons.

Have yourself a merry little Christmas.

Coconut Macaroons

MA's Coconut Macaroons


Ingredients ready for hand mixing

Preheat oven to 350º F.

Line a baking sheet with parchment paper.

1 tbsp sugar
2 ½ cups sweetened shredded or flaked desiccated coconut
2 large egg whites or use ¼ cup of prepared egg whites
1 tsp vanilla
Pinch of salt 

Cool cookies on sheet
In a large bowl, combine sugar, coconut, egg whites, vanilla and salt. Using your hands, mix well until ingredients are completely combined.

Dampen hands with cold water. Form a heaping tablespoon of mixture (or a little less if you want smaller macaroons) into a loose haystack shape and place on the prepared baking sheet. Repeat with remaining mixture, space about 1 inch apart.

Bake about 18 minutes or until golden brown, rotating the baking sheet about half way through.

Transfer baking sheet to a wire rack to cool.

When cool, move macaroons to an airtight container. They can be stored here for about 3 days or in the freezer for one month.

Makes 12 large or 18-20 smaller cookies. 

Friday, 21 December 2012

Secret Shortbread


Secret Shortbread Cookies

There are fancier cookies and more colourful cookies, and there are certainly cookies with many more ingredients, but this simple, unassuming, four-ingredient cookie is my hands-down Christmas cookie favourite. (My daughter’s whipped shortbread is a close second.)

When I married into the Stewart name, I thought I should learn to make shortbread. This was the first shortbread recipe I tried. The original recipe came from a Scottish import shop in Winnipeg. I am not sure why they called it “Secret Shortbread” and the shop has been gone for many years. I do know it’s the best shortbread recipe I’ve tried.

You can roll the dough and cut out shapes or you can roll the dough into small balls and press each ball down with two fingers. I prefer to roll the dough and cut into small circles. I have tried other shapes, including stars and other holiday motifs, but the circle shape cooks most evenly and stands up best in storage. I use the smallest circle cookie cutter I have. It is 1½ inches in diameter. The size gives you a perfect bite of shortbread. If you decide to use a large circle, remember to allow more baking time.

You can store shortbread cookies stacked between sheets of wax paper in a tin for two or three weeks. You can also freeze them if you intend to keep them around for a month or two.

This little Scottish treat is a great addition to any holiday cookie tray and the perfect cookie for a sherry and shortbread get-together with friends.


MA’s Secret Shortbread

Four ingredients for shortbread
Preheat oven to 325° F.

1 lb unsalted butter, softened
1 cup icing sugar
1 cup cornstarch
4 cups flour

Cream butter until fluffy.

Add icing sugar and cornstarch. (If you are mixing in a Kitchen Aid Stand Mixer, be sure to change from beater to dough hook before adding flour and kneading dough.)


Knead until cracks are visible

Add flour and knead until dough cracks. This happens in just a few minutes so be careful not to over process the dough.


Roll dough to ½ inch thick and cut with cookie cutter or roll into small balls and press down with two fingers. Place on ungreased cookie sheet.

MA's Tip: Always use a room temperature cookie sheet to help prevent cookies from loosing their shape and browning too quickly on the bottom. If you'll be reusing a cookie sheet, be sure it's cooled before placing unbaked cookies on it. I like to wash each sheet between each of its visits into the oven.

Bake 20 to 30 minutes.

Makes 10 dozen 1½ inch cookies.

Printable Recipe for MA's Secret Shortbread

Shortbread and Sherry


Tuesday, 20 November 2012

Chewy Carrot Oatmeal Cookies

An easy to make drop cookie
When the cookie craving hit me, I headed for my little blue plastic recipe box and leafed through the Cookies section. I decided on this recipe for Carrot Oatmeal Cookies because I had all the ingredients on hand and I didn't really feel like looking any further. I have no idea where I originally got the recipe that I wrote on the card, but it does make some tasty cookies. And because they are drop cookies, aside from taking time to grate the carrot, they come together quickly.

Unfortunately, I forgot to photograph the finished cookies before they were eaten. What can I say? They were really good, and, in my defence, I did share.


MA’s Chewy Carrot Oatmeal Cookies


Preheat oven to 375° F.
Grease cookie sheet (s).

1 cup brown sugar, firmly packed
½ cup butter or margarine
2 eggs
½ cup milk
1 cup carrots, grated
1 ½ cups flour
1 tsp baking powder
½ tsp baking soda
½ tsp salt
½ tsp cinnamon
½ tsp nutmeg
2 cups quick-cooking oatmeal
1 ½ cups seedless raisins

MA’s Tip: To keep the raisins from drying out during cooking, plump them up before adding them to the recipe. Soak them in water for five to ten minutes; then drain them well in a colander. This is also a good time to pick through for any stems or woody bits that may have been packed with the fruit.

Cream together the sugar, butter and eggs.

Add milk and carrots to creamed mixture. Stir until well mixed.

Sift together flour, baking powder, baking soda, salt, cinnamon and nutmeg.

Add oatmeal and raisins to dry ingredients and stir until raisins are well coated with the flour mixture.

Add dry ingredient mixture to wet ingredients.

Drop by tablespoons onto cookie sheet.

Bake about 15 minutes or until cookies are lightly browned all over.

Makes 3 dozen cookies.