Pages

Showing posts with label appetizer. Show all posts

Wednesday, 7 August 2013

Keeley's Super Easy Dips


Bob's Mango Avocado Salsa - ready to stir and serve
Keeley's Four-Ingredient Guacamole - scoop and enjoy
You’ve met my daughter Keeley in my kitchen on previous occasions (she made Chocolate Pretzel Chip Cookies and Pumpkin Dog Cookies). On a recent visit with the parental unit, she treated us to these quick and simple dips. Both were delicious.

The first she calls Bob’s Mango Avocado Salsa. Bob is a student in the Foods Class at the high school where Keeley teaches. The Foods Class held an Iron Chef competition and Keeley was asked to be one of judges. This salsa was one of Keeley’s favourite entries that day. And when you try it, you’ll know why. It’s so good.

The second dip is a Four-Ingredient Guacamole. Again, very easy to put together. Keeley tells me she didn’t think she liked guacamole or even avocados until tasting some guacamole earlier this year. Now she’s a fan. Just shows how our tastes and appreciation of different foods change over time. Every now and then, it’s good to try a food you’ve previously steered away from; you might be surprised.

Cuban Oregano
Keeley brought most of the ingredients with her and thought she would find the rest in mom’s pantry. Alas, I did not have the sriracha sauce or cilantro she needed. Keeley substituted a Mexican picante chili sauce for the sriracha in the guacamole. In place of the cilantro, she used Cuban oregano, which was handily growing in my kitchen. Not truly an Origanum, Cuban oregano’s Latin name is coleus amboinicus. It is used as a culinary herb in Latin America. I got my first cuttings of it years ago at course put on by Dave Hanson of Sage Garden Herbs. The soft, succulent leaves of the Cuban oregano plant have a sweet, spicy aroma and were just the right addition to the Mango Avocado Salsa. I am so proud of the way my daughters can so easily make substitutions in, tweak and create recipes. (Hey, they're better at it than Mom, but they probably already know that, too.)


Bob’s Mango Avocado Salsa


Mango prep for salsa
3 mangoes, peeled, pitted and diced
1 avocado, peeled, pitted and diced
Juice of 1 lime
1 tsp cilantro or Cuban oregano, minced

Mix all ingredients together.

Serve at once with tortilla chips or refrigerate for up to 2 days.

This salsa can also be served as an accompaniment to grilled fish.


Keeley’s Four-Ingredient Guacamole

Avocado prep for guacamole
2 ripe avocados, peeled, pitted and mashed
1 tomato, seeded and diced
Juice of ½ lime
3 to 4 tbsp Sriracha sauce or other hot pepper sauce

Mix all ingredients together.

Serve at once with tortilla chips or refrigerate for up to 2 days.

Monday, 15 July 2013

Two Open-Faces: Smoked Salmon with Feta & Bruschetta

Smoked Salmon with Feta & Bruschetta

These two open-faced sandwiches – the smoked salmon with feta and the bruschetta - are among my go-to recipes. I usually prepare them without a recipe and, once you have made them a few times, you won’t need the recipes either. But for the sake of the blog and those who are trying them for the first time, I have written my basic recipes here. Out of habit, I always make these two sandwiches to be served together. We enjoy them as a light dinner, but they also serve as appetizers - substantial appetizers.

I can’t remember the first time I made bruschetta, but it has been part of my kitchen repertoire for at least twenty years. I love its freshness, especially when the tomatoes and basil are at their peak in the summer, but any time of year, these sandwiches are so good.

It’s been many years since I first tasted the smoked salmon with feta cheese sandwiches at the Serendipity Gardens and Cafe in beautiful Rossport, Ontario. I had the pleasure of dining there only a few times when we lived in northwestern Ontario, but it was an enjoyable experience each time. My special memory of Serendipity was our twentieth wedding anniversary dinner – a surprise planned by my husband. It was very romantic, right down to the music that played while we enjoyed our meal: the owner had made a mixed tape (that’s like a play list for those too young to know cassette tapes) of tunes from the year we were married. Anyway, if you find yourself on the north shore of Lake Superior, stop at Serendipity and let me know if the smoked salmon and feta is still on the menu.

The bread used for both sandwiches is a baguette: a skinny stick of French bread. You can try other breads, but this is my preference. For the bruschetta, you can rub the slices with garlic before toasting them, but I prefer to add the garlic to the tomato mix. For the smoked salmon itself, I use whatever is available in my grocery store. The type that comes with a peppercorn seasoning is good for folks like me who are apt to sprinkle a lot of pepper on the sandwich anyway. For a change of pace, try candied salmon or even another type of smoked fish. It’s all good.

MA’s Smoked Salmon with Feta Sandwich

For the smoked salmon with feta sandwich
150 grams or 5 to 6 ounces smoked salmon (I used smoked salmon with peppercorn seasoning)

113 grams or 4 ounces feta cheese in brine – reserve 3 to 4 tsp of brine

1/8 cup chives or green onions, chopped fine

3 to 4 tsp olive oil 
          
10 slices baguette, cut on diagonal, 1 to 1 ½ inch thick

Make a creamy feta and chive topping
Drain feta, reserving 3 to 4 tsp of brine.

Mix together with love the feta, olive oil and brine until creamy. Add more oil if needed to get a creamy consistency.

Add chives to cheese mixture and stir until combined.

Spread cheese mixture on baguette slices.

Top with smoked salmon
Top each slice with pieces of smoked salmon.

Serve immediately.
           
Makes ten open face sandwiches.


MA’s Bruschetta 

Preheat oven to 450º F.
Cover baking sheet with parchment paper or foil to ease clean up.

For the bruschetta
4 tomatoes, chopped

¼ cup fresh basil, minced

1 tbsp fresh oregano, minced

1/8 cup fresh flat leaf Italian parsley, minced

1 to 2 tsp garlic, minced

2 tbsp grated Parmesan cheese

2 tbsp grated mozzarella cheese

Tomato mixture on toasted baguette slices
20 to 24 slices of baguette, white or whole wheat, cut on diagonal, 1 to 1 ½ inch thick

2 to 3 tbsp olive oil

In a bowl, mix together with love the tomatoes, basil, oregano, parsley, garlic, Parmesan and mozzarella. Set aside.

Note: This bruschetta mixture can be made up to a day ahead and refrigerated. Just before serving, take the mixture out of the refrigerator and bring it to room temperature. Drain away any excess liquid from mixture before putting it on the toasted baguette.

Place baguette slices on baking sheet. Brush with olive oil. Bake 3 to 4 minutes or until the slices are toasty and lightly browned.

Put a tablespoon or two of bruschetta mix on top of each piece of toasted baguette.

Serve immediately.

Makes 20 to 24 open faced sandwiches.


Tuesday, 15 January 2013

Harry's Cheeks in Caps

Pickerel cheek in mushroom cap: ready to pop into your mouth

I love feeding people so I was more than happy to welcome our friend Harry over for supper, especially when he wanted to do some of the cooking. When I found out that he was going to make pickerel cheeks, well, that was extra special.

Pickerel cheeks are a bit of a delicacy. They are literally the cheeks of the pickerel - one of the most popular fish with anglers and commercial fishermen where I live in Manitoba. (Pickerel are also known as walleye in some parts of the world.) These cheeky morsels have been compared to scallops, but I think the cheeks are more tender. The trick to making this recipe might be in actually procuring the pickerel cheeks. Unless you catch a lot of pickerel yourself or have the pleasure of knowing someone who does, you’ll have to look for a commercial source. I found one source online selling two 2 ½ pound bags for $109.00 (!) and a few ads on Kijiji for a more reasonable $10 a pound. However you get them, pickerel cheeks are a tasty treat.

Harry served the cheeks and caps with ciabatta buns spread with garlic butter then lightly toasted. Of course, they would make a great appetizer, but we had them as part of dinner and rounded out the menu with a side of herbed wild rice, bacon cheddar tarts, and Barefoot carrot salad. It was a feast.

And now, with Harry’s kind permission, here’s the recipe for his pickerel cheeks and caps.

Harry’s Pickerel Cheeks in Caps

 
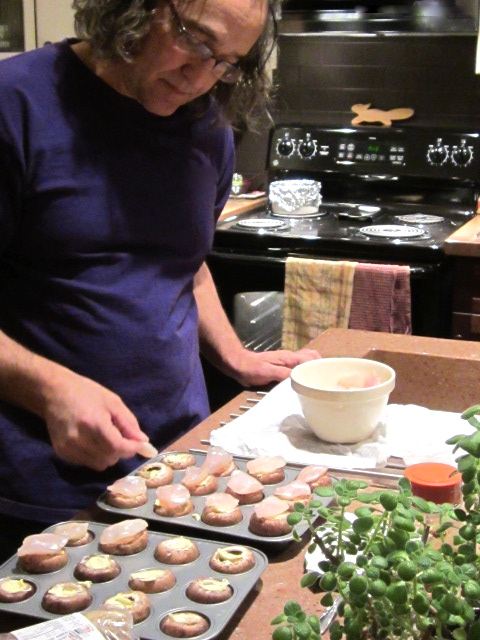
Harry places cheeks on caps
  Preheat oven to 400º F.

  ½ lb pickerel cheeks, fresh or thawed

  24 good-sized mushrooms, stems removed
  (Harry used brown   mushrooms)

  ¼ lb garlic butter, purchased or homemade

  Parmesan cheese

  Paprika

  In mini-muffin tins, place mushroom caps bottoms up.

  In each mushroom cap, place about a ½ tsp garlic butter
  covered with a single pickerel cheek.

  Over each and every stuffed mushroom, liberally sprinkle
  Parmesan cheese and paprika.

Pile on the Parm and paprika
  Bake for 15 to 20 minutes or until cheeks are cooked through and
  everything is nicely browned.


Our feast!


Monday, 31 December 2012

Holiday Highlights from MA's Kitchen

Our Christmas Pizzas
Though I haven't posted in a week, you can bet I've been in the kitchen and enjoying so many good things to eat that my mouth is watering just thinking about them all. Holiday cooking is never a one-person thing and special thanks goes to my family who helped in so many ways to keep the good things coming from the kitchen. As I write this, the kitchen and, in fact, the whole house and probably out into the driveway, are filled with the aroma of simmering turkey stock. Later today there will be a wonderful turkey soup to enjoy (followed by a post for those interested in how to make them). Now, back to the week that was.

Tapenades: Sun-dried tomato (left) and apricot fig (in bowl)
As usual, we did not get to eat all the appetizers we'd planned for Christmas Eve. That might have something to do with the delicious duo of tapenades we started with. One was sun-dried tomato and the other apricot fig. Both were made by my daughter Keeley. She put them on slices of baguettes with goat cheese, then popped them in the oven until the cheese melted slightly and everything was warmed through. Delicious! I've asked Keeley to share these recipes with me and we'll get them blogged here as soon as possible. I know you will enjoy them.

Prepping chicken and cream cheese roll-ups

Our family turkey dinner was on Boxing Day this year, which left Christmas dinner wide open for exploration. We choose to make homemade pizzas for our Christmas dinner. However, after an hour or so of unwrapping gifts we needed a little snack. It was Keeley to the kitchen to make chicken and cream cheese tortilla roll-ups. I think this was another online recipe that she added her own special touch to and I will be sure to ask her to share it here on the blog as well. They were so good we ate them all and followed it up with a little exercise: a walk with the dogs through the deep snow.

Building individual pizzas

Then it was Christmas pizza time. I made a double batch of fresh pizza dough, enough for eight individual pizzas. For toppings, there was a choice of caramelized onions, goat cheese, feta cheese, mozzarella cheese, spicy tomato sauce, two kinds of pepperoni, fresh tomato slices and fresh mushroom slices. Then  Keeley had the idea to use some of the left-over apricot fig tapenade as a pizza sauce. It went really well with the caramelized onions and goat cheese. We had a lot of fun building our individual Christmas pizzas and even more fun eating them.

On Boxing Day, we dined on a turkey dinner with all the trimmings. Unfortunately, I was so involved in the preparation and totally enjoying the company of my family that I didn't take any blog-worthy photos.

Here's my recipe for a single batch of the pizza dough. It's an easy quick-rise dough and you can fit a double batch into the 4 1/2 quart bowl of a Kitchen Aid mixer for mixing and kneading, which makes it even easier. You can also change the taste by subbing one cup of whole wheat flour for one cup of all-purpose. It's Merry Pizza the whole year through!


MA’s Quick Rise Pizza Dough


2 ½ cups all-purpose flour, divided into 1 ½ cups and 1 cup
1 tbsp quick-rise instant yeast
1 tsp salt
1 cup hot water (not boiling)
2 tbsp vegetable oil
Oil, for oiling pans
Cornmeal, to sprinkle on pans

In a large mixing bowl or the bowl of a Kitchen Aid mixer, combine 1 ½ cups of flour with yeast and salt.

Pour hot water and oil into flour mixture and mix well.

Mix in remaining flour to make a slightly sticky dough.

Form the dough into a ball or leave it in the Kitchen Aid mixer if you're using one.

On a lightly floured surface – or using the dough hook on the Kitchen Aid mixer, knead the dough for about five minutes or until smooth and elastic.

Cut dough in half; cover with a dampened tea towel and let rest for 10 minutes. To make the pizzas later, refrigerate the rounds of dough at this point. Bring to room temperature before rolling or stretching.

Meanwhile, lightly oil the pizza pans and sprinkle lightly with cornmeal.

Roll dough to desired thickness and transfer to pans, or place dough directly on pan and pat and stretch to desired shape and thickness.

Let rise for 15 minutes – a little longer if you are making a thick crust.

Add your favourite toppings.

Bake in 450º F. oven for 16 to 18 minutes.

Makes 2 thin crust pies or 1 thick crust pie.


Saturday, 15 December 2012

Make Ahead Meatballs

Baked and ready for the freezer. How will you use your meatballs?

Tis the season for another make ahead recipe! I'll be using my latest batch of meatballs over the holidays - most likely as an appetizer in a sweet and sour sauce and most certainly as part of the big family feast in a delicious mushroom gravy.

As always, buy the best ground beef you can get. I am fortunate that the local grocery grinds their own beef and does a good job of it, too. Thanks, Kevin, at Park Place. I like to keep these meatballs on the small size - about 1 1/2 inches in diameter. That way they're easy to pop into a sauce or enjoy in a meatball sub. If you decide to roll them into bigger balls, be sure to add some cooking time.

I use powdered onion and garlic instead of fresh in this recipe, because I can never mince the onion or garlic small enough to get the fine texture I want in the little meatballs. In this recipe, I've used only basic spices, but you can add what you like depending on how you plan to use the meatballs. For instance, throw in some basil and oregano, if your meatballs are going to have a mostly Italian future.

I've added instructions for freezing and using both non-cooked and pre-cooked meatballs. I prefer to pre-cook and then freeze them for future use as it speeds things up when I am ready to use them, but you can go either way.

MA's Make Ahead Meatballs


Get out the ingredients
6 lbs lean ground beef 
2 cups fine breadcrumbs
2 tbsp onion powder
1 tbsp garlic powder
½ tsp ground pepper
1 tsp dry mustard
4 large eggs, lightly beaten


Close the door and let them cook.

In a large bowl, mix together ground beef, breadcrumbs, onion powder, garlic powder, pepper, mustard and eggs. 

Form mixture into small balls, about 1 ½” in diameter. 

MA's Tip: An extra pair of hands make fast work of forming the meatballs. If your helper's meatballs don't look exactly like yours, don't panic. They'll all be delicious.

If freezing uncooked meatballs: Place meatballs on lightly oiled, foil-lined baking sheets. Cover with plastic wrap and place in freezer for 2 or more hours until meatballs are firmly frozen. Remove frozen meatballs and divide into portions for packaging. Package into plastic freezer bags or freezer containers. Label and freeze for up to six months. To use uncooked frozen meatballs, defrost and cook on lightly oiled, foil-lined baking sheet at 350° F. for 15 to 20 minutes.


If freezing cooked meatballs (my preference): Preheat oven to 350° F. Place meatballs on foil-lined baking sheets. Cook at 350° F. for 15 to 20 minutes. Remove meatballs to room temperature, foil-lined baking sheets, using a paper towel to gently wipe off any excess grease from meatballs. Place into freezer until meatballs are frozen through, about two hours. Remove frozen meatballs and divide into portions for packaging. Package into plastic freezer bags or freezer containers. Label and freeze for up to six months. To use cooked frozen meatballs, thaw in microwave or drop into warm sauce and allow to heat thoroughly. 

Makes about 8 1/2 dozen meatballs.


Monday, 10 December 2012

Quiche Today - Tarts Tomorrow

Bacon Cheddar Quiche

I find myself in a make ahead mood as the holidays get ever closer. Here's a way to make a very tasty bacon cheddar quiche to enjoy today plus nine tarts you can slide into the freezer for a quick addition to your holiday appetizer tray. (Of course, you can always opt to eat or freeze it all today.)

To start you will need some pastry dough, enough for one nine-inch pie shell and 9 tart shells. You can buy pre-made pastry dough and roll it out, or buy ready-made uncooked pie shells and tarts. It's up to you. I like to make a batch of pastry dough to have on hand in the freezer and will share that recipe in a future post (now posted at flaky lardy piecrust).

You will also need some bacon. Choose whatever kind you like - regular, low salt, maple - but I find that pork works better here than turkey bacon or other skillet strips. I cut the bacon into small pieces before frying it. A pair of kitchen shears makes this easy. I use old cheddar cheese but you can substitute a mild cheddar. For a different flavour experience, you can use a Swiss cheese. You can use any type of milk - I use skim - and any kind of cream - I use half-and-half, which is half milk, half cream (using any less cream will work but you'll miss some richness). It all depends on how much butterfat you want to include.

This quiche is great for dinner served with a nice fresh salad and is equally at home as part of a breakfast or brunch buffet.


Bacon Cheddar Quiche and Tarts

 Preheat oven to 375° F.

pastry dough or pre-made crusts, enough for 1-9” crust for quiche and 9 tart shells
1 lb bacon, cut into small pieces
2 cups onions, finely chopped
1 ½ cups old cheddar cheese, grated, and divided in half
6 large eggs
1 cup milk
1 cup half-and-half cream
½ tsp freshly grated or ground nutmeg
½ tsp freshly ground pepper

If using pastry dough, roll out the crust and fit into 9” pie plate, trimming excess from edge. Then roll out dough for tarts. Use cookie cutter or overturned glass to cut out nine circles and fit each into tart pan.
Use kitchen shears to cut bacon
Cut bacon into small pieces using a knife and/or kitchen shears. In a large pan, fry bacon until crisp but not dry. Place bacon on paper towels to sop up any excess fat. Remove most of the bacon fat from pan, leaving a little to coat the pan.

Gently sauté onions in remaining bacon fat until softened. (Instead of bacon fat, you can use a bit of butter or olive oil.)


Ready to fill shells
In a large bowl, mix together eggs, milk, cream, nutmeg and pepper. Stir well with lots of love. 

Into the prepared piecrust, place half of the cooked bacon bits and half of the cooked onions. Spoon half of the egg/milk mixture into the piecrust and top with half the cheese.

Divide the remaining bacon and onions between each of the prepared tart shells. Spoon the remaining egg/milk mixture into each of the tart shells and top each with remaining cheese.

Filled and ready for oven
Bake for 25 to 30 minutes until top is lightly browned and filling is firm. (The pie will need about 5 minutes longer than the tarts.)

To Enjoy Today: Cool slightly and serve while warm.

For Future Enjoyment: Cool completely. Pie can be wrapped tightly in two layers of plastic wrap, labeled with date, and frozen for up to six months. Tarts can be placed in a freezer container lined with a layer of waxed paper or paper towels to keep them from shifting, labeled with date, and frozen for up to six months. To reheat from frozen, remove from wrap/container. Place on baking sheet in 375° F. oven and heat until warmed through, about 35-45 minutes. If thawed, warm through for about 20 minutes. Using the microwave for reheating is not recommended as the crust will not stay crisp. Serve while warm.

Printable Recipe for MA's Bacon Cheddar Quiche and Tarts

Bacon cheddar tart for future enjoyment