Pages

Tuesday, 30 April 2013

Manitoba Cheesesteak Sandwiches from Darcy in the Kitchen


 Darcy's Manitoba Cheesesteak Sandwich


Philadelphia has their Cheesesteak Sandwich and now, thanks to my daughter Darcy, Manitoba has ours.

As the name implies, a cheesesteak sandwich has something to do with cheese and something to do with beef. The cheese in this Manitoba version is provolone and the steak is roast beef, and they both came thinly sliced from the deli counter at the grocery store. Darcy adds lots of sautéed mushrooms and garlic, caramelized onions and some bell pepper strips. And then there is the option (though Darcy would probably say it’s not optional) of melting your favourite cheez-in-a-jar and drizzling it liberally over everything. She used submarine rolls, but you can cut up some Italian or French bread for your sandwich base.

To me the ingredients are a wee bit pricey for a sandwich, especially the provolone and the deli roast beef. But you really get a lot of food and a ton of taste so it’s well worth it. This makes up four very large and delicious sandwiches. You will not be hungry after eating one.


Darcy’s Manitoba Cheesesteak Sandwiches

 Preheat oven to 375º F.


4 large submarine or sausage buns, slice horizontally if they aren’t already sliced

extra virgin olive oil

2 white onions, sliced thin

1 green bell pepper, cut into strips

1 red bell pepper, cut into strips

4 tsps minced garlic

2 cups fresh mushrooms, sliced

1 to 1 ½ lbs deli roast beef, sliced thin

½ to ¾ lb provolone cheese, sliced thin

cheez in a jar, melted (optional)

Stir some love into the onions and peppers
In a large frying pan on medium-high heat, add enough olive oil to just cover the bottom of the pan. Add onions and sauté until very soft. Add peppers and garlic and continue sautéing until all are softened, about ten minutes, stirring often with love. Remove to a bowl and keep warm.


Sauteed mushrooms waiting for assembly
Add mushrooms to frying pan and sauté until nicely browned. (Note: you can cook the mushrooms with the onions and peppers if you like. Not everyone at our house enjoys mushrooms, so we cook them separately.) Remove to a bowl and keep warm.


Warm the roast beef slices
Place roast beef slices in frying pan and sauté for a few minutes until they are warmed through and softened.


If using the cheez in a jar, melt some in a bowl and keep it warm for drizzling. We used the microwave but a double boiler would work, too.


On a large baking tray, open out the four buns and assemble the sandwiches using the onions and peppers, mushrooms, roast beef, and melted cheez. Finish with a layer of provolone.


Place in oven until the provolone is nicely melted.   

Serve immediately.
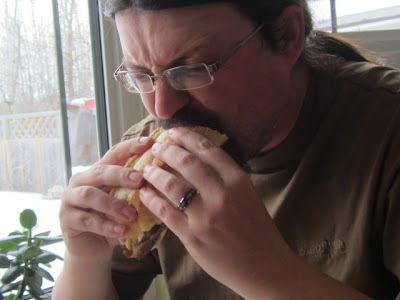

Now that's a big sandwich!


Friday, 26 April 2013

Lucky, Carrots, and Where did April go?

Lucky carrots: these three weighed in at just over two pounds

Life got really busy for me this month and I can hardly believe it's been almost three weeks since my last post.  I had a tight deadline on a book project I was working on, coupled with a lovely visit from my daughter Darcy and grandson Emmett. Of course, I have been in the kitchen, too, and will be sharing some recipes very soon, including two dishes prepared by Darcy.

For those of you reading this who live in or around Winnipeg, I want to tell you about a grocery store I shopped at recently. It's Lucky Supermarket on Winnipeg Avenue, and if you've already been there you'll know why I am so excited about it. I first became aware of Lucky Supermarket in a column in the Saturday newspaper featuring foods that aren't particularly well-known in these parts. Many times I noticed that Lucky Supermarket was listed as the place to find these foods. A few months ago, another home cooking enthusiast told me about his trip to Lucky and how excited he was to find all the ingredients for a Thai supper he was making for his family.

When I found myself in the West End with twenty minutes to spare before I had to be somewhere else, I decided to check out Lucky Supermarket. Driving past the giant lion statues guarding the parking lot, I knew this wasn't going to be any ordinary food store. And when I encountered the altar with incense and offerings tucked into the corner of the entryway, I felt transported out of the chilly Winnipeg afternoon. On this first time-limited visit, I only had time to discover the produce department and one of the aisles. I have to admit I was dazzled by the variety of Asian vegetables and the fresh herbs, some of which I had never seen in their fresh state. But what really struck me was the display of bulk carrots. I had never seen carrots as large as these before. I had to have some. And I have to tell you they were as delicious as they were gigantic! The one aisle I had time to visit had the largest variety of noodles I had ever seen in one place. I checked out with my carrots and noodles, admired the cheerful children's umbrellas decorating each cashiers' till, and told myself I would return to Lucky Supermarket soon.

A week later I was back with my daughter and grandson and enough time to get a look at the rest of the store. There is a restaurant, a bakery, a meat counter, cookware and, as Emmett excitedly pointed out to us, a shelf lined up with large, colourful ceramic prosperity cats. On that trip I bought a few more items including fresh green beans and beets, both red and golden, as well as a confection called Sticky's (a super sweet rolled wafer with pink stripes) and some candy-coloured tapioca pearls (still working on a recipe for those). As Lucky is associated with Family Foods, you can pick up your more standard grocery items there, too.

I checked out their website at luckysupermarket.ca and found they have two locations in Edmonton and one in Calgary as well. I'll be shopping Lucky again soon as there are many items I want to try like the purple yam cakes and the roasted duck. Maybe I will see you there.


Sunday, 7 April 2013

Share the Cottage Pie


Savoury cottage pie

When I go to the frozen food aisle of the grocery store in search of shepherds pie, I find a flat brick of a casserole made with ground beef, gravy, a scant handful of vegetables and a topping of mashed potatoes. There are two flaws in this scenario.
  1. What I have found is not, strictly speaking, a shepherds pie. Foodies and lexicographers will tell you that a shepherds pie is made with lamb or mutton. Make the same casserole with beef and it’s a cottage pie. You can research this at length on the internet and here’s a link from the British news outlet The Guardian to get you started.
  2. Regardless of what you call it, the store-bought version will never ever be as good as the cottage pie you make in your own kitchen.
This cottage pie recipe is based on a Gordon Ramsay recipe I found several years ago on Recipezaar (which has since become food.com). My version makes a savoury supper dish in a quantity large enough for sharing or freezing for future use. As you’ll see in the last photo in this post, I made two 9” round casseroles (one for dinner, one for the freezer) plus one single-serve casserole to freeze and take to my mom.

There are a few ways to tailor your cottage pie to suit your tastes and your pantry. You can play with the type of vegetables you want to use. For instance, parsnips, turnips, and mushrooms work well. Just keep them finely diced or grated so everything cooks up evenly and the pie keeps its characteristic minced texture. The food processor is your friend for this task. I like the flavour that a good red wine gives the ground beef, but you can substitute beef stock if you prefer. The mashed potato topping is traditional and delicious. I’ve used Parmesan with the potatoes, but cheddar complements this dish very well, too. I’ve also used mashed cauliflower instead of potatoes to top the cottage pie. If you do this, I recommend steaming the cauliflower, as boiling it makes the mash a little too watery.

However you choose to make this dish your own, I hope you and yours enjoy this cottage pie.


MA's Cottage Pie


Cottage pie ingredients
Preheat oven to 350º F.

Have ready 2 - 9” round casserole dishes or 1 - 9” x 13” casserole dish

2 tbsp olive oil (if ground beef is fatty, omit the oil)
2 lbs lean ground beef
1 cup celery, finely diced
2 cups onions, grated
2 cups carrots, grated
2 cloves garlic, finely minced
4 tbsp Worcestershire sauce
2 tbsp tomato puree
2 tsp dried thyme
2 tsp dried rosemary
2 cups red wine (substitute with beef stock, if preferred)
1 cup beef stock
3 to 4 pounds potatoes, peeled and cut into pieces
4 tbsp butter
2 egg yolks
2 to 4 ounces Parmesan cheese, grated
sea salt and black pepper, to taste

Cooking down the filling

In a large frying pan, heat the oil. Add ground beef and sauté until cooked through.

Add celery, onions, carrots, and garlic. Saute until vegetables are softened.

Add Worcestershire, puree, herbs, wine and beef stock. Cook together for 15 minutes or until the liquids have cooked down and the sauce is thickened.

Meanwhile, boil the potatoes until cooked through. Drain and let stand a few minutes to dry out slightly. Mash the potatoes together with butter, egg yolks, cheese, salt and pepper.

Enough to share
Place beef filling in casserole dishes.

Cover beef filling with mashed potato topping. Grate extra cheese on top of pie.

Bake for 25 to 30 minutes or cool and wrap for the freezer.

To cook from frozen, defrost in the refrigerator, unwrap and cook for 25 to 30 minutes or unwrap and cook for 1 to 1 1/2 hours until pie is cooked through. 


Wednesday, 3 April 2013

Chocolate Pretzel Chip Cookies from Keeley in the Kitchen


Up close with Keeley's Chocolate Pretzel Chip Cookies

I mentioned that my daughter Keeley and I spent a lot of time together in the kitchen during spring break. After making the cookies for the dogs, we made these chocolate pretzel chip cookies for the humans. (To be perfectly honest, Keeley made the cookies and I took photos.)

This recipe is based on a chocolate chip cookie recipe from the Our Favourite Recipes Cookbook put together by St. Mary’s Academy Mother’s Guild in 1984. (St. Mary’s Academy is a Catholic girls school in Winnipeg, Manitoba. Both our daughters were students there for a time.) It’s a good basic recipe for chocolate chip cookies (daughter Darcy says it’s the best) and we’ve adapted it here to make room for Keeley’s idea: adding chocolate-covered pretzels. And a good idea it is!

Without further delay, here’s the recipe. FYI – these won’t last long!


Keeley’s Chocolate Pretzel Chip Cookies


Preheat oven to 350º F.
Lightly grease cookie sheets.

Getting ready to make cookies

1 cup softened butter, unsalted preferred

1 cup brown sugar

1 tsp vanilla

2 eggs, beaten

2 ½ cups flour

½ tsp salt

1 tsp baking soda

½ cup semi-sweet chocolate chips

Cutting pretzels into pieces
1 cup chocolate-covered pretzels, cut into pieces


In a large bowl or the bowl of a Kitchen Aid stand mixer, cream together the butter and brown sugar.

Add vanilla and eggs to butter/sugar mixture and beat until combined.

Sift together the flour, salt and soda. Add to the batter and blend all ingredients well.

Fold in the chocolate chips and pretzel pieces.


Drop by spoonfuls
Drop by spoonfuls onto cookie sheets. You can strategically place a piece of pretzel on top of each cookie at this point.


Bake for 10 minutes.


Makes about 4 dozen cookies.


These disappeared quickly!

Monday, 1 April 2013

Pumpkin Dog Cookies from Keeley in the Kitchen


Stashu enjoys a pumpkin dog cookie
Spring break brought some special visitors to our house: my daughter Keeley, her husband Arthur and their dogs Fletcher and Allie. It’s always a pleasure to welcome them and I enjoyed having Keeley’s company in the kitchen.

Keeley in the kitchen
Among the many things we cooked together were these pumpkin cookies for the dogs. Most dog owners will be familiar with the wonders of pumpkin in remedying canine constipation as well as canine diarrhea. Explaining this apparent paradox is well beyond my knowledge base although I think it’s safe to say that pumpkin is generally a good thing for doggy digestion. (Also, if either of these ailments is a serious or long-term problem for your pet, promise me you’ll get him or her to the vet pronto.)

Making your own pet treats is a great idea, of course, because you get to control what’s in them. It’s not something I do for my dog Stashu on a regular basis, so for him it’s a nice change from a store-bought biscuit. He really enjoyed these pumpkin cookies, as did Fletcher and Allie.

Keeley found this recipe on Pinterest and we tweaked it just a bit: doubling the amount and finding the right measure of canned pumpkin to make the dough stiff but pliable. (If you are not familiar with pinterest.com, consider this your introduction and be warned that you may find it mildly addictive.)

Fletcher likes his pumpkin treat
You can cut the cookies into whatever shape you like, even scoring the dough into squares will work, or dig out those bone-shaped cookie cutters. I don’t seem to have any of those since I purged my cutter collection, so we went with rounds and the dogs didn’t mind a bit.

We hope you will try making this recipe for your furry companions. Send me a photo of your pet enjoying his or her pumpkin cookies and I’ll share it here on the blog.


Keeley’s Pumpkin Dog Cookies


 Preheat oven to 350º F.
 Cover baking sheets with parchment paper.


Ingredients for pumpkin dog cookies
4 eggs

1 ½ cup pumpkin puree

4 tbsp skim milk powder

½ tsp sea salt

2 tsp dried parsley

5 cups rice flour


Mixing in the ingredients
In a large bowl or the bowl of a Kitchen Aid stand mixer, beat together eggs and pumpkin.

Stir in the milk powder, salt and parsley until well mixed.

Gradually add rice flour – about a cup at a time – and mix until all the ingredients are well blended. The dough will be quite stiff, but if it is unmixable, add a little more pumpkin puree or water so that everything combines well. It will be like a shortbread dough looking a little dried out and cracking here and there.


Rolling the dough on a sunny afternoon


Roll the dough to about ½-inch thickness and cut into desired shapes.


Bake for 20 minutes.


Remove from oven and let cool completely before storing (or sharing with your pets).

Makes approximately 4 ½ dozen 1 ½” rounds and 2 ½ dozen 2” rounds.


Who's a good boy?