Pages

Tuesday, 25 June 2013

Take-Along Dark Chocolate Sheet Cake

Looking homely but tasting great: Dark Chocolate Cake with Chocolate Butter Cream Frosting
This is one of those recipes that has been in my little wooden recipe box forever. I return to it whenever I want to make a quick and easy cake and especially if it's a cake that has to do a little travelling. This dark chocolate cake bakes in a 13" x 9" pan and if you're really lucky you have one of these pans with a lid, and if you're really, really lucky your lidded pan fits into one of those padded carriers and comes with its own ice pack.

As I said, this cake is easy to put together. You can mix it up in a Kitchen Aid stand mixer, but the batter is quite thin so it's easy enough to do by hand. When it's fully cooled, you can add icing (I like a chocolate butter cream and the recipe for it follows) or just dust on a little icing sugar. I recommend storing this cake in the refrigerator and serving it while it's still a little chilled. The chocolatey cake is moist and tasty by itself and is also an excellent base for a scoop of vanilla ice cream and a few strawberries.

MA's Dark Chocolate Sheet Cake

Ingredients ready and pan greased and floured
Preheat oven to 350 F.
Grease and flour a 13" x 9" x 2" pan.

2 cups sugar
1 3/4 cups flour
3/4 cups cocoa
2 tsp baking soda
1 tsp baking powder
2 eggs
1 cup buttermilk or soured milk
1 cup strong black coffee
1/2 cup vegetable oil
1 tsp vanilla


Beat for 2 minutes.
In a large bowl, combine sugar, flour, cocoa, baking soda and baking powder.

Add eggs, milk, coffee, oil and vanilla.

Beat at medium speed for 2 minutes. Batter will be thin.


Don't worry: the batter should be thin.

Pour batter into prepared pan.

Bake 35 to 40 minutes or until tester poked into centre of cake comes out clean. The middle of the cake may have a sag but as long as the tester comes out clean, it's done. The saggy middle will be disguised by the frosting.

Cool cake completely in pan.

Frost with chocolate butter cream icing or dust with icing sugar.

Store in refrigerator and serve slightly chilled.

Makes about 12 servings.

Printable Recipe for MA's Dark Chocolate Sheet Cake

MA's Chocolate Butter Cream Frosting


2 tbsp butter
1 1/2 cups icing sugar
3 tbsp cocoa
2-3 tbsp cream or milk
1/2 tsp vanilla

Cream butter.

Sift together icing sugar and cocoa.

Add sugar and cocoa mixture to butter, alternating with cream or milk.

Blend in vanilla and beat until creamy.

Spread onto cooled cake.

Makes icing for 13" x 9" sheet cake. Double the recipe for a layer cake.

Saturday, 22 June 2013

Granny's Scones: A memory to be savoured


Granny's Scones
My husband’s grandmother came to Canada from Scotland as a young woman and married a handsome young blacksmith. They settled in a small town in a picturesque valley in southern Manitoba where they raised two daughters. By today's standards, life was far from easy with wood stoves for cooking and wringer washers and clotheslines on laundry day. Housekeeping was an art and Granny was a master. Neighbours, friends and family were always welcome around her table.

Around Granny's table, circa 1952
When I met Granny, she was in her mid-seventies and still going strong: looking after her own home, garden and yard and tirelessly contributing to her church and community. From that first time I met her and for many, many years to come, I always looked forward to Granny’s scones. In fact, her melt-in-your-mouth scones were renowned among her family and friends and were enjoyed time and again whether she served them with butter and jam or slices of cheese and cold leftover meat. Getting some of Granny's scones to take home was a real treat.

Granny seldom cooked from written recipes. So one day many years ago when I was visiting her home, I followed her around her kitchen as she made her scones. I wrote down what I saw her doing. The recipe for scones was so much a part of her that she didn’t need to measure carefully: it was a handful of this and a half teacup of that. You’ll find the measured ingredients in the recipe below. Granny cooked the scones in her old electric frying pan the kind with a lid. You’ll need a frying pan or griddle with a lid to make your scones. When you make these, be sure to enjoy one with a cup of tea and offer a toast to celebrate a sweet Scottish Granny and her scones. 

Granny’s Scones

Setting up to make scones
4 cups flour

1/3 cup sugar

2 tsp baking powder

½ tsp salt

½ lb butter, cold

2 eggs

½ cup milk

Sift together the flour, sugar, baking powder and salt.
Half the dough rolled out and cut into 8 wedges

Cut butter into dry ingredients until it is in small pieces and distributed evenly throughout the dry ingredients.

Mix together the eggs and milk.

Add the wet ingredients to the dry ingredients, adding more milk a half-teaspoonful at a time until you have a stiff dough. Mix well using your hands.

Divide dough in half.

Place in pan, then cover with a lid
On a well-floured board, roll one half of the dough into a circle approximately 8” in diameter. Cut into 8 wedges. Repeat the rolling and cutting with the second half of the dough.

Heat a griddle or large fry pan over medium heat. Place wedges into pan. Cover and cook for 5 to 10 minutes or until golden brown on bottom. Turn wedges over and cook covered for about another 5 minutes.

Remove from pan and place on rack to cool.

Cooked scones can be kept in a covered container on the counter for two to three days or refrigerated for about five days.

Serve, either whole or split, with butter, jam, cheese and/or cold cuts.


Wednesday, 12 June 2013

When a burger is not a burger

Maybe not the most artful but definitely delicious Burger Salad


When is a burger not a burger? When it’s a burger salad! You’ll really have to try this to appreciate how all the components of your average burger transform into this tasty meal-in-a-salad.

The first time I had this delicious salad was a few years ago when I hosted a Pampered Chef party. I really do like the Pampered Chef product line and have been really pleased with all the things I have bought from them. Okay, there are a few items which don’t get used a lot, but that has more to do with me than the item. Anyway, I do digress. If you want to see the original version of this recipe or get more Pampered Chef recipes, just visit the Pampered Chef website. And if you want to host a party, I can recommend two excellent Pampered Chef reps in my part of the world. (And yes, the salad in the photo is served on a beautiful bamboo tray from Pampered Chef.)

As I am apt to do, I have rewritten the recipe to include my modifications. I used whole wheat sesame seed topped hamburger buns and ground chicken, but you can use whatever buns you like and choose beef, turkey or vegetarian meat alternative for the ground meat. While you can prep the ingredients in advance, it’s best to combine them immediately before serving. Enjoy your burger salad.

MA’s Burger Salad

Preheat oven to 425º F.

For the burger salad

4 hamburger buns, sliced into croutons
1 lb ground meat: lean beef, chicken, turkey or vegetarian alternative
Red onion, divided into ¼ cup finely diced and ¼ cup sliced
½ cup finely diced dill pickles
¾ cup ketchup
1 tbsp yellow mustard
8 cups romaine, cut or torn into bite-sized pieces
2 tomatoes, diced
1 cup shredded cheddar cheese

On a large baking sheet, place the sliced hamburger buns in a single layer. Bake about 10 minutes or until the croutons are slightly toasted. Cool completely.

Helping hands prep the lettuce
In a frying pan, cook ground meat over medium heat until cooked through. Break the meat into crumbles as it cooks.

In a large bowl, combine the cooked ground meat, diced onion, diced pickles, ketchup and mustard. Mix well.

Place the lettuce on a large serving platter or in large bowl. 


Dig in!

Spoon meat mixture over the lettuce. Sprinkle tomatoes, cheese and sliced onion on top. Arrange croutons around the platter/bowl. Serve immediately.

Serves 2-3 as a main course, 4-6 as a side salad.


Wednesday, 5 June 2013

Customizable Salade Niçoise

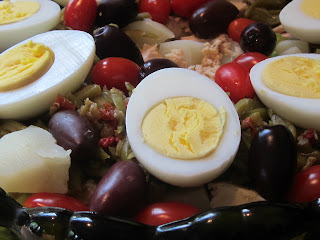
Salade Nicoise with Tarragon Dressing

This full meal salad is one of my go-to recipes that I’ve been making forever. And every time I make it, it’s a little different, but always delicious. I encourage you to try it and make it your own. Let’s take a look at what’s in it.
Lettuce: Use whatever kind of lettuce you like or combine a few of your favourites. The important part here (and anytime you’re making a salad with lettuce) is prepping it. Separate the leaves and wash them under cold water. Then dry them thoroughly. I use a salad spinner. My first salad spinner was a garage sale special that I used for many years. It wasn’t very large though. So, when I had the chance, I bought a bigger one. The one I have is from The Pampered Chef and it’s one of the most used items in my kitchen. After I spin the lettuce, I lay the leaves on paper towels to absorb as much water as possible. If I am not going to use the lettuce right away, I wrap more paper towels around the lettuce leaves and put them in an open plastic bag in the fridge. Your goal is to have clean, crisp, dry lettuce for your salad.
Olives: The Niçoise in the salad’s name refers to the Niçoise olives originally used in it. These are small, purple olives that are a little on the sour side. I use whatever olives I have on hand, usually Kalamata. Pitted or unpitted, whole or sliced is not important. And, if you are really not an olive-eater, you can leave them out of the salad and it will still be good.
Beans: Tinned or freshly cooked, green beans are always a part of this salad. My favourite are the French style green beans. They are thinner than regular green beans and I admit I like the tinned varieties that come with little bits of red pepper in them. If you use the tinned beans, be sure to drain them well.

Tuna: An essential ingredient for this salad, you can use whatever kind of tuna you like. Mine has always come from a tin and I usually have solid white on hand. I break it up into bite-sized chunks.

Potatoes: You can use whatever potatoes you have in your pantry. I’ve tried them all in this salad at one time or another. Just boil them, skin on or off, and cut them into small pieces. Tiny, new potatoes are really good in here, too. You can prepare your potatoes ahead and have them in the fridge and ready to go at salad-making time.

Eggs: Hard boil them, peel them and cut them in half. (For an easy way to hard boil eggs: place eggs in a pot of cold water being sure they aren’t crowded too close together. Put pot on stove and bring to a boil. Once it’s boiling, turn the heat off and set the timer for 17 minutes. When the timer goes off, take the eggs out of the water and plunge them into a bowl of ice water. Keep them there until cool. You’ll get a nice, hard-boiled egg with a yellow yolk – no grey discoloration. Don’t know why this works, it just does.)

Tomatoes: They need to be fresh. Use grape or cherry tomatoes or regular-sized tomatoes sliced into rounds or chunks.

The Dressing: Salade Niçoise is usually topped with some sort of vinaigrette. I always have this Tarragon Dressing with it. Though it’s a very simple creation, it still has room for customizing. You can use a red wine vinegar or a sherry vinegar or, for a bit of a different taste, balsamic vinegar. I like using olive oil, but if you want to use half olive oil and half of another oil, give it a try. The herbs are dried. I have used fresh but prefer the dry ones in this dressing. In a pinch, you can substitute prepared mustard for the dry mustard.
If you give this salad a try, let me know what you used in it and how you liked it. 


MA’s Salade Niçoise

6 or 7 cups lettuce, your favourite kind, torn into bite-sized pieces

1-398 ml tin French style green beans, drained, or 2 cups fresh beans, steamed and cooled

2-184 gram tins tuna, drained and flaked into chunks

12 olives, Kalamata or your favourite, pitted or unpitted

5 potatoes, boiled, cooled and cut into bite-sized chunks

4 hard boiled eggs, peeled and halved

½ pint grape or cherry tomatoes or 2-3 tomatoes cut into bite-sized chunks

Place the lettuce in the bottom of a large salad bowl.

Arrange the remaining ingredients on top of the lettuce in way that pleases you.

Immediately before serving, pour the Tarragon Dressing over the salad. Leftovers will keep for a day or two in the fridge, but be prepared for the limp lettuce.

Serves 2 – 3 as a main dish. 


MA’s Tarragon Dressing

2 tbsp wine vinegar
6 tbsp olive oil
½ tsp salt
½ tsp dried thyme
¼ tsp dry mustard
¼ tsp dried tarragon
¼ tsp dried basil
dash of pepper

Combine all ingredients in a cruet or jar.

Shake well. Pour onto salad just before serving.


Saturday, 1 June 2013

Dorion Strawberry Pie

A slice of beautiful Dorion Strawberry Pie


It's the first of June and that means it's officially strawberry time. We've had a late spring where I live, so it will likely be a few weeks before the local berries are available for picking. But that's okay. The wait will be worth it. 

When you've had your fill of eating them out of hand or in the inevitable strawberry shortcake, give this easy-to-make strawberry pie a whirl. It's perfect to make during the hot days of summer (bring it on, Mother Nature), because with the store-bought crust, you won't need the oven on. The smell of the mashed berry mixture as it cooks is so good that I find myself standing over the saucepan and inhaling deeply to get the full strawberry aroma. The pie will need some time in the fridge to cool and set, so plan accordingly and make it early in the day or even a day ahead.

This is a recipe that comes from our time spent in Northwestern Ontario. We would go strawberry picking at Ouimet Valley Strawberries. As you left with your fresh, ruby red treasures, the friendly people there gave you a printed sheet of strawberry recipes. This one was originally named Wisconsin Strawberry Pie, but it always puts me in mind of a warm June day in Dorion. 

MA’s Dorion Strawberry Pie

Ready to make pie
1 prepared 9-inch pie shell (graham, vanilla or shortbread)

7 cup strawberries, divided into 2 cups (for mashing) and 5 cups (whole or halved)

1 cup sugar

2 tbsp cornstarch

½ cup water

1-8 ounce package cream cheese, softened


Mashing two cups of the berries

Mash two cups strawberries.


Stir, stir, stir to make the glaze 
In a large saucepan, mix together sugar and cornstarch. Gradually stir in the mashed berries and water. Cook mashed mixture over medium heat. Stir with love until the mixture thickens and comes to a boil. Boil the mixture for about one minute, stirring all the time to keep it from sticking to the pan. Remove from heat and cool.


Layer of softened cream cheese


Soften cream cheese. You can do this by beating it until it’s smooth or put it in the microwave for 25 seconds or so.

Spread cream cheese on bottom of pie shell.


Fill pie shell with whole or halved strawberries.

Top with cooked, cooled strawberry mixture.

Chill until set, about 4 hours or overnight.

Makes six slices.