Pages

Wednesday, 24 July 2013

Steak with Kabob Taste

Kabob-flavoured steak served with grilled onions, quinoa and carrots


The barbecue grill gets busy this time of year. When my husband brought home a package of sirloin tip beef steaks, I remembered a marinade I wanted to try from the Canadian Living/Barbecue Collection cookbook. (Yes, the same source used for the delicious balsamic honey pork tenderloin.)

I hope you will try this marinade. The spice blend is wonderfully aromatic in a Moroccan, middle eastern way, and steaks and onions that marinate in it were oh so good. Canadian Living recommends serving this with grilled tomatoes, which would be wonderful. We had ours with the grilled onions, carrots cooked in foil packets, and quinoa, and that was wonderful, too.

MA's Kabob-flavoured Steaks

Steaks with marinade ingredients
4 beef steaks for grilling, about 8 oz each
2 onions, sliced about 1/2 inch thick
1/4 cup lemon juice
1/4 cup olive oil
2 tbsp minced garlic
1 tsp ground allspice
1/2 tsp black pepper
1/4 tsp cinnamon
1/4 tsp cayenne pepper

In a large dish, cover steaks with onion slices.

In another bowl, mix together the remaining ingredients. Pour marinade over onions and steaks, turning to coat. 
Steaks and onions on the grill

Marinate refrigerated for at least 4 hours or up to 1 day. (Ours marinated for 4 hours and the flavours developed quite well.)

Remove onions and steaks from marinade and bring to room temperature.

Grill steaks until desired doneness, turning once during grilling. Meanwhile, grill onions, turning once, until tender and lightly charred.


Printable Recipe for MA's Kabob-flavoured Steaks

Monday, 22 July 2013

The Farmers Market and Rhubarb in July


A slice of Lunar Rhubarb Cake


Rhubarb and spring go together. I don’t have a rhubarb patch of my own and didn’t manage to raid any from my patch-blessed friends this spring, so when I came across some beautiful rhubarb at a local farmers market in July, I couldn’t resist taking home a few bunches.

The Mallard as seen from Petersfield Market
The market I speak of is a recent addition in our part of the world and I highly recommend it. The vendors are friendly and the variety of offerings they bring together range from handmade bags and quilts, baked goods, funky furniture for your deck, local produce, and much, much more. You’ll find it every summer Sunday from 11 am to 3 pm in Petersfield, in the park beside the big mallard statue. I plan to return there throughout the season. Wherever you are, support your local farmers market.

But back to the rhubarb and today’s recipe for Lunar Rhubarb Cake. I love this cake. It is rich in spices, buttery, easy to make and serves a crowd. The recipe came from a Canadian Living magazine in the early 1980s. I googled it before this writing and you can still find a rhubarb cake recipe on the Canadian Living website. It’s different from the recipe I’m sharing here, but, knowing how well they test their recipes at Canadian Living, I am sure it will be good if you try it. In my Internet search, I also came across a fabulous looking rhubarb bundt cake on a canadian foodie website. The ingredients were quite similar to this recipe and it looked terrific baked up in the fancy bundt pan. Check it out. Many great recipes and ideas on this Edmonton-based website.

Why Lunar? Because the surface of the baked cake resembles craters on the moon.

Without further ado, here’s the recipe for Lunar Rhubarb Cake.


MA’s Lunar Rhubarb Cake

(Originated in Canadian Living, Summertime Special 1982)

Preheat oven to 350ยบ F.
Butter a 9” x 13” baking pan.

All measured for the batter and the topping
Batter:
½ cup butter
1 ½ cups sugar
1 egg
1 tsp vanilla
2 cups flour
1 tsp baking soda
½ tsp salt
1 cup buttermilk or soured milk (that's a little less than 1 cup milk with 1 or 2 tbsp of vinegar or lemon juice added to curdle the milk)
2 cups rhubarb, chopped into 1” pieces
1 tbsp flour

Topping:
¼ cup butter
2 tsp cinnamon
1 cup brown sugar, packed
Rhubarb tossed with flour 


In a large mixing bowl or a KitchenAid stand mixer, cream together the butter and sugar until smooth and creamy.

Beat in egg and vanilla.

Sift together flour, baking soda and salt. Add to creamed mixture alternating with milk – making 3 dry and 2 liquid additions.

Toss rhubarb with 1 tbsp flour and mix gently into batter. This prevents the rhubarb from sticking together in the batter; helps each piece stay separate from the other.
Ready for the oven

Spoon batter into baking pan.

In a medium mixing bowl, blend together the butter, cinnamon and brown sugar. Sprinkle this topping evenly over the surface of the cake.

Bake for 45 minutes or until the cake has risen and browned and comes away from the edges of the pan.

Makes 12 to 18 pieces, depending on how large you want them.


Lunar Rhubarb Cake ready to slice


Monday, 15 July 2013

Two Open-Faces: Smoked Salmon with Feta & Bruschetta

Smoked Salmon with Feta & Bruschetta

These two open-faced sandwiches – the smoked salmon with feta and the bruschetta - are among my go-to recipes. I usually prepare them without a recipe and, once you have made them a few times, you won’t need the recipes either. But for the sake of the blog and those who are trying them for the first time, I have written my basic recipes here. Out of habit, I always make these two sandwiches to be served together. We enjoy them as a light dinner, but they also serve as appetizers - substantial appetizers.

I can’t remember the first time I made bruschetta, but it has been part of my kitchen repertoire for at least twenty years. I love its freshness, especially when the tomatoes and basil are at their peak in the summer, but any time of year, these sandwiches are so good.

It’s been many years since I first tasted the smoked salmon with feta cheese sandwiches at the Serendipity Gardens and Cafe in beautiful Rossport, Ontario. I had the pleasure of dining there only a few times when we lived in northwestern Ontario, but it was an enjoyable experience each time. My special memory of Serendipity was our twentieth wedding anniversary dinner – a surprise planned by my husband. It was very romantic, right down to the music that played while we enjoyed our meal: the owner had made a mixed tape (that’s like a play list for those too young to know cassette tapes) of tunes from the year we were married. Anyway, if you find yourself on the north shore of Lake Superior, stop at Serendipity and let me know if the smoked salmon and feta is still on the menu.

The bread used for both sandwiches is a baguette: a skinny stick of French bread. You can try other breads, but this is my preference. For the bruschetta, you can rub the slices with garlic before toasting them, but I prefer to add the garlic to the tomato mix. For the smoked salmon itself, I use whatever is available in my grocery store. The type that comes with a peppercorn seasoning is good for folks like me who are apt to sprinkle a lot of pepper on the sandwich anyway. For a change of pace, try candied salmon or even another type of smoked fish. It’s all good.

MA’s Smoked Salmon with Feta Sandwich

For the smoked salmon with feta sandwich
150 grams or 5 to 6 ounces smoked salmon (I used smoked salmon with peppercorn seasoning)

113 grams or 4 ounces feta cheese in brine – reserve 3 to 4 tsp of brine

1/8 cup chives or green onions, chopped fine

3 to 4 tsp olive oil 
          
10 slices baguette, cut on diagonal, 1 to 1 ½ inch thick

Make a creamy feta and chive topping
Drain feta, reserving 3 to 4 tsp of brine.

Mix together with love the feta, olive oil and brine until creamy. Add more oil if needed to get a creamy consistency.

Add chives to cheese mixture and stir until combined.

Spread cheese mixture on baguette slices.

Top with smoked salmon
Top each slice with pieces of smoked salmon.

Serve immediately.
           
Makes ten open face sandwiches.


MA’s Bruschetta 

Preheat oven to 450ยบ F.
Cover baking sheet with parchment paper or foil to ease clean up.

For the bruschetta
4 tomatoes, chopped

¼ cup fresh basil, minced

1 tbsp fresh oregano, minced

1/8 cup fresh flat leaf Italian parsley, minced

1 to 2 tsp garlic, minced

2 tbsp grated Parmesan cheese

2 tbsp grated mozzarella cheese

Tomato mixture on toasted baguette slices
20 to 24 slices of baguette, white or whole wheat, cut on diagonal, 1 to 1 ½ inch thick

2 to 3 tbsp olive oil

In a bowl, mix together with love the tomatoes, basil, oregano, parsley, garlic, Parmesan and mozzarella. Set aside.

Note: This bruschetta mixture can be made up to a day ahead and refrigerated. Just before serving, take the mixture out of the refrigerator and bring it to room temperature. Drain away any excess liquid from mixture before putting it on the toasted baguette.

Place baguette slices on baking sheet. Brush with olive oil. Bake 3 to 4 minutes or until the slices are toasty and lightly browned.

Put a tablespoon or two of bruschetta mix on top of each piece of toasted baguette.

Serve immediately.

Makes 20 to 24 open faced sandwiches.


Tuesday, 9 July 2013

My Boyfriend's Birthday Cake

Crispy Rice Layer Cake
Don’t get the wrong idea, folks. This boyfriend-girlfriend relationship is all above board, spouse approved, and largely based on cake - specifically crispy rice cake. When I know my friend needs a little cheering up or most of the time for no special reason, I make him a crispy rice cake.

For his birthday, it was only natural to forgo the usual sheet cake and make him a crispy rice layer cake. It's super easy, quick to make and you won't even heat up the oven. If you want to make one for your boyfriend, here's how.

MA's Crispy Rice Layer Cake

Butter 2 springform pans.

4 tbsp butter
1 package (10 oz) regular marshmallows or 4 cups miniature marshmallows
7 cups crispy rice cereal
1 to 1 ½ cups frosting of your choice

Mixture cooling in springform pans
In a large, microwavable bowl, heat butter and marshmallows on high for 3 minutes, stirring after 2 minutes. If things have not melted down after 3 minutes, microwave in 15 or 20 second intervals, stirring after each, until the mixture is smooth.

Add crispy rice cereal to butter and marshmallow mixture. Stir until all the cereal is well coated. A well-buttered spatula makes stirring easier.

Divide mixture in half and put each half into one pan. Press mixture into pan using the buttered spatula, wax paper or buttered fingers if the mixture is cool enough.


Crispy and good with chocolate frosting!
Leave in pans for 10-15 minutes. Then remove from pans and place onto rack covered with wax paper to dry completely, about an hour.

Place one cake on serving plate and cover top with frosting. Place second cake on top and cover top with frosting. You can cover the sides of the cake if you wish, but I like the look of the cereal cakes.

Serves 8 to 10.


Saturday, 6 July 2013

Two for the Grill

Balsamic Honey Tenderloin

How does a barbecue meal come together at your house? Around here, it takes two. I do the prep in the kitchen and my husband handles the grilling. It works well for us except that over the years we’ve become so used to our roles that neither of us is really comfortable with switching over (plus I am not a big fan of fire of any kind, so our system is okay with me.)

Last weekend we two had a lovely meal out on the deck. We enjoyed balsamic honey tenderloin, potato and onion packets and coleslaw. The tenderloin recipe came from Canadian Living/The Barbecue Collection: a really big cookbook full of recipes you’ll want to try. The recipe said we’d have a delicious crust on the meat, but that didn’t happen. However, it was so tasty and so melt-in-your-mouth good that we didn’t miss the crust. The leftover pork was equally good the next day. The potato and onion packets are something we’ve been making for years (and you probably have your own version of it, too) so I thought it was a good idea to write it down somewhere. For convenience, I used bagged coleslaw and tossed it with bottled coleslaw dressing and a few little extras to make it my own (think celery seeds, caraway seeds, a teaspoon of sugar and maybe some extra mayo).

MA’s Balsamic Honey Tenderloin

from Canadian Living/The Barbecue Collection Cookbook

Pork skinned and marinade mixed
2 pork tenderloins, about 12 oz each
2 tbsp liquid honey
2 tbsp grainy mustard
2 tbsp balsamic vinegar
1 tbsp olive oil
1 clove garlic, minced
¼ tsp salt
¼ tsp pepper

Remove any silverskin (connective tissue) from the pork.

Mix together honey, mustard, vinegar, oil, garlic, salt and pepper.

Brush with marinade and turn occasionally
Put the pork in a non-metal dish and pour marinade over it. Turn the meat to coat. Marinate for 20 minutes or, refrigerated, for up to 1 day. (We marinated ours for about 8 hours.)

Remove pork from marinade, reserving the marinade to brush on as a glaze as the meat grills.

Place pork on greased grill over medium-high heat. Brush with marinade. Grill, covered, turning occasionally, until just a hint of pink remains in centre (about 160ยบ F), about 18 minutes.


Sliced and ready to enjoy

Transfer meat to cutting board; tent with foil and let rest for about five minutes before slicing.

Makes 4 to 6 servings.


MA’s Grilled Potato and Onion Packets
Potato and onion with seasonings
3 Russet potatoes, sliced thinly - almost, but not quite through, to the bottom of the potato

1 white onion, thinly sliced

olive oil

sea salt or seasoning salt (I used a roasted garlic and sea salt seasoning)

pepper (I used freshly ground red, white and black pepper)

Cut heavy-duty aluminum foil or two layers of regular foil into 3 - 12” squares (or larger pieces if needed to accommodate the potatoes).
The packet

On each piece of foil, place a sliced potato. Put slices of onion between each slice of potato. Spray or drizzle a little olive oil over the potato and onions. Sprinkle with salt and pepper. Repeat with other two potatoes and remainder of onion slices.

Wrap foil around the potato and onion to make a packet.

Place the packets on the grill over medium high heat. Cover and cook for 30 to 40 minutes, turning once or twice as they cook.


Grilled to perfection!

Remove packets from grill and open carefully. After all, it is a hot potato in there. Turn out into serving dish. Hungrier folk may wish to have a whole packet to themselves and that’s okay, too.


Monday, 1 July 2013

Just for Fun Jelly Dessert

Jiggly, Just for Fun Jelly Dessert
We all have better things to do than make this jelly dessert. I first came across this type of jelly confection when searching for holiday recipes last December. This dessert goes by many names online: broken glass jello, glass block holiday jello, stained glass jello, even mosaic dessert bars.  Some recipes suggest it can be served as the salad course, but I think it's way too sweet for that.  Anyway, I printed off a few different variations for making this jelly and tucked the recipes away figuring there would not be enough time to add this to the Christmas table (and really there were so many sweet things ready to eat that I couldn't justify one more). A few weeks ago I came across the printed recipes and since I had the time and the desire for a dessert, I gave it a try - just for fun.

Keep in mind that this is a jelly dessert, and like all jelly desserts, it takes time to set. Best to make this a day or two in advance.

There is plenty of room for interpretation with this dessert. You can change the vessel you make it in, the colours of the blocks or the shape of the blocks. If you want to see how others have used this jelly, do a Google image search or search Pinterest and be inspired. (And if you're curious about how gelatin works, check out this Knox Gelatin website.) I made my jelly dessert in a large silicon bundt mold, but you could do individual molds, or let it set into fancy dessert glasses, or use a 9" x 13" pan and cut the jelly into squares for serving.  I think using all red jello blocks would make a great Canada Day dessert, especially if you had a maple leaf cookie cutter to cut the blocks. If you try it, let me know and send me a photo, I'd love to see what colours you used. Now, go have some fun.

MA’s Just for Fun Jelly Dessert


4 – 3 ounce or 85 gram boxes of gelatin dessert in your choice of flavours/colours (I used cherry, orange, lime and lemon in the one I photographed)

4 cups boiling water

2 envelopes unflavoured gelatin powder (I used Knox brand)

½ cup cold water

1 ½ cups boiling water

1 ¾ cups sweetened condensed milk (where I live sweetened condensed milk is sold in 300 mL tins, so I had to buy to 2 tins to get the right amount for this dessert)

Make your coloured jelly: For each flavour/colour, dissolve one box of gelatin dessert in one cup of boiling water. Pour each flavour/colour into a separate container that has been very lightly greased. Chill in refrigerator until each is set firmly, at least 3 hours but overnight is best. Cut into blocks or desired shapes.

If you are making your dessert in a jelly mold, lightly grease it so that the dessert will come out easier. I used olive oil on my silicon bundt and wiped out almost all of it before using it to avoid any greasy taste on the dessert.


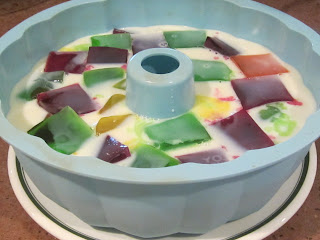
Jelly blocks placed in lightly greased mold
Place coloured jelly blocks into the pan/mold you are using: 9” x 13” pan, jelly mold, individual dessert glasses or bowls.


Pour completely cooled milky jelly over the blocks
Making the milky jelly: In a large bowl, pour in the cold water and sprinkle the gelatin powder on top and let stand. In about 1 minute, the gelatin will be softened. Add the condensed milk. Stir and cool completely. If you pour this into your mold before it’s cooled, your jelly blocks will be melted by it.

Mixing the milky jelly with the coloured jelly: Pour the cooled white, milky jelly over the jelly blocks and chill overnight.

Unmold and enjoy!
To serve:
If you’ve made your dessert in a pan/mold like I did, unmold the dessert by dipping the pan/mold briefly into warm water and inverting it onto a serving platter.

If you’ve made your dessert in a sheet pan, just cut it into whatever shape you like and serve.

And, if you’ve made the dessert in dessert glasses that don’t need to be unmoulded or cut up, you are ready to go (although I would be tempted to put a dab of whipped cream on top of each dessert)!