Pages

Monday, 28 January 2013

Making friends with pulled pork


Barbecue pulled pork and coleslaw on Panini bun 
A few posts back I mentioned buying some pork loins at a really good price. That left me one problem: how to use it all. Pulled pork came to mind. The only drawback was that I didn’t really care for pulled pork all that much. I had tasted it for the first time about a dozen years ago in North Carolina. I had been invited to a loading dock lunch with the crew who were working on the new building for which I was doing PR and communications. I felt it was an honour for a corporate type like me to be included. It should have been a great experience, right? I mean barbecued pulled pork was practically born in North Carolina and I’d been told a local caterer known for their barbecue was doing the cooking.

Well, maybe it was just a bad day for the caterer or maybe my Northern Canadian palate simply could not appreciate the legendary culinary offerings of the South. Either way, all I can remember about that lunch was trying to be polite as I ate the cold, greasy, fatty mess of pork plopped on my plate next to the oddly warm puddle of coleslaw and the hard white roll. Not good. Not good at all. In fact, it was enough to keep me far away from pulled pork even as it rose to fame over the next ten years of the foodie explosion and enjoyed increasing popularity with caterers in my part of the world.

Once in a while though, I follow my own advice and I decided to give pulled pork a second chance. I remembered my daughter Keeley telling me she’d made barbecue pulled pork in her slow cooker for a potluck and that she’d been asked for an encore of the dish for the next potluck. I called Keeley for her recipe. (I am so fortunate to have children who not only have grown up to be smarter than me, but to be great cooks, too.) Keeley couldn’t give me the exact recipe she used, because there wasn’t one, but she described her basic technique. I’ve incorporated it here along with the ingredients I used. I found the rub recipe at Steven Raichlen's Barbecue! Bible (he's written 28 books about barbecue so he knows what he's talking about) and the rest of the recipe is gleaned from a combination of recipes from several sites. The result was very, very tasty. I am happy to report that pulled pork and I are once again on the best of terms.

Every bite GONE!
This barbecue pulled pork makes a terrific suppertime sandwich served up on a pillow of a Panini bun with side of homemade coleslaw. As you can see in the photo above, I piled my coleslaw right on top of the pork and it was yummy. You can also serve it over rice or mashed potatoes. Any leftover pulled pork will mix well with baked beans (and I’ll be posting a recipe for making delicious baked beans in a few days).


MA’s Slow Cooker Barbecue Pulled Pork

3 lb pork loin roast

For the Basic Barbecue Rub:
¼ cup coarse salt (kosher or sea salt)
¼ cup brown sugar
¼ cup paprika
3 tbsp freshly ground pepper
1 tbsp garlic powder
1 tbsp dried onion flakes
½ to 1 tsp cayenne pepper
½ tsp celery seeds

Mix together the ingredients for the Basic Barbecue Rub. Put it into a jar as you won’t need the full cup of Rub to make this recipe. Store away from heat and light. It will keep for several months.

For the Slow Cooker:
3 onions, sliced
1 cup barbecue sauce, homemade or purchased
1 cup cooking liquid, either pop or broth or water (I used ginger ale, but read root beer is good, too.)

Rubbed pork the next day
Cover the roast with part of the Rub, massaging and patting it well into the meat.

Place the roast in a covered dish and put in refrigerator over night.


Into the slow cooker

  The next day, place the onions in the bottom of the slow cooker.
  Place the pork roast, fat side up, on top of the onions.

  Add the barbecue sauce and cooking liquid.

  Set slow cooker on low heat and cook for 6 hours.


Pulling the pork
  Remove the pork from the slow cooker and put into a large
  casserole. The meat may fall apart as you move it, so take care
  when lifting it out. Pull the pork apart with two forks. 

  Return meat to slow cooker and cook on low heat for 1 to 1 ½
  hours.

  Serve in sandwiches, over rice or potatoes, or mixed into baked
  beans.

Printable Recipe for MA's Slow Cooker Barbecue Pulled Pork


Wednesday, 23 January 2013

Medivnyk: A Honey of a Cake

Sweet little honey cake drizzled with glaze

A few weeks ago my mom, who is a funny, warm and well-intentioned eighty-one year old, started talking about honey cake and how she’d like to make one on a day when she was feeling up to it. With that, she planted a seed. (I think her intentions may have been a touch calculated that day, but what the heck, I love her and I love to make her things.)

It’s been a long, long time since I have made honey cake, but I knew just the recipe I wanted to use and headed for my recipe box. There I found the batter-spattered card: “Never Fail Medivnyk (Ukrainian Honey Cake).” It’s a Mme Jehane Benoit recipe, originally published in 1970 in The Canadiana Cookbook: A Complete Heritage of Canadian Cooking. The recipe appeared in the Saskatchewan section of the cookbook and actually called for Saskatchewan or Manitoba honey. Luckily, my neighbour is an apiarist so I had real Manitoba honey in my pantry.

Since this was for my mom, I wanted to make a few small cakes that would better suit her needs than one large loaf, bundt or tube cake. I have a Nordic Ware® Multi-Mini Bundt pan that makes six cute, little sculpted bundt cakes. I only tried the pan once and then put it on the shelf. My recollection is that whatever I had baked in it, stuck in the pan and/or the pan was tough to clean. But I could picture how sweet the cake would look made in these pretty shapes and persevered – generously coating every nook and cranny of the pan with butter. (The recipe actually made enough batter to fill the fancy pan plus two four-inch springform pans.) The buttering up paid off. Five of the six cakes turned out great and the sixth only had a few points missing. I’m already thinking about what little cakes I’ll bake next in my mini bundt pan. (Incidentally, if you want to helpful information about cake pan sizes, check out the Joy of Baking.)

For the medivnyk taste test, I fearlessly asked two genuine Ukrainians - our good friends Barb and Larry. They gave the honey cake a thumbs up, and Barb said it reminded her of the honey cakes her mom used to make. Mme Benoit and I are honoured.

I’ve rewritten the original recipe very slightly here to make it a little easier to follow, and I included a Lemon Honey Glaze recipe just in case you’re feeling fancy.

Now get yourself some honey and take some time to create and enjoy this homemade treat. Mme Benoit wrote, “It would keep well one month, well wrapped in transparent paper. Keep it in a cool place. It improves with age.” That’s good to know, but I am sure these little cakes won’t be around that long.

MA's Medivnyk

Ready to make a honey cake

Adding the cooled honey
Preheat oven to 325º F.


1 cup honey
3 cups flour
1 tsp soda
1 tsp baking powder
1 tsp cinnamon
¼ tsp salt
½ cup strong coffee, cooled
1 tsp vanilla
grated rind and juice of one orange
2 tbsp butter
1 cup sugar
4 eggs, separated

Generously coat pan(s) with butter or solid shortening. This is especially important if you are using a shaped cake pan. This makes one 12-cup Bundt or tube cake, one large loaf cake, or six to eight smaller cakes.

Bring the honey to a boil and then cool it.

Sift the flour with the soda, baking powder, cinnamon and salt. Do this twice.

Combine coffee with vanilla and the grated rind and juice of the orange.

In a large mixing bowl, cream butter and sugar.
Beginning to fold in egg whites

Add the cooled honey to butter and sugar.
Beat the egg yolks and add to honey/butter mixture.

Alternate adding the dry ingredients and coffee mixture to the egg yolk/honey/butter mixture.

Beat egg whites until stiff and then fold them into the batter.

Pour the batter into prepared pan(s).

Cool on rack
Bake about 45 minutes for loaf pan or single tube pan; about 25 minutes for mini-cake pans. Use cake tester or skewer to test for doneness.

Cool upright in pan for 10 minutes. Unmold and cool on cake rack.

Drizzle with Lemon Honey Glaze, if desired.


MA’s Lemon Honey Glaze

½ cup icing sugar
Ready for the taste test
2 tbsp lemon juice
2 tbsp honey

Mix all ingredients together, pressing out any little lumps of icing sugar.

Drizzle over cakes, quick breads or muffins for some sweet citrus tang.


Monday, 21 January 2013

Why I love roasted veggies

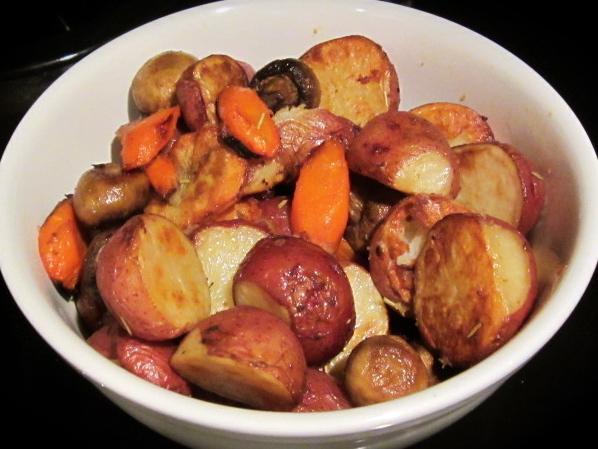
Roasted vegetables: Potatoes, mushrooms, carrots


For dinner last night, I was trying out a new way to bake chicken breasts that I had seen on a tv commercial for Hellman's mayonnaise (very good, by the way, and you can get the recipe at parmesan crusted chicken). I was thinking about a suitable side. I decided on roasting some vegetables.

I love roasted vegetables for a variety of reasons.

  • I can mix and match whatever fresh veggies I have on hand. Yesterday, I used 2 pounds of mini-potatoes, a handful of whole mushrooms, a couple of carrots and, as always, a few teaspoons of minced garlic.
  • Preparation is easy. Aside from giving the veggies a good wash (which you would do anyway),  cutting up a few of the larger, denser vegetables, throwing them in a baking dish with some oil and seasoning, and giving the whole thing a stir now and then while they're in the oven, there is nothing fancy about it.
  • You can vary the seasonings. Oil and spices are great on their own. Or try a little maple syrup or balsamic vinegar or whatever suits your tastes and your menu.
  • Roasted veggies stand alone as a delicious side or play well with others in salad, pasta and grain dishes. 

Roasting vegetables is a kitchen basic. Here's how I do it.

  1. Use a baking sheet or large casserole dish. For easy clean-up, you can cover the bottom with aluminum foil or parchment paper. Spread or spray a good coating of olive oil over the bottom and sides of the dish.
  2. Clean your vegetables. You can leave the skins on the vegetables as they will be delicious.
  3. Think about which vegetables will take longer to cook (for example dense veggies like potatoes, turnips and yams). Cut those into smaller pieces. The idea is to have all the vegetables evenly cooked through at serving time.
  4. Place the vegetables in the cooking dish. Be sure they aren't crowded. They need room to brown and get crispy on the outside.
  5. Add olive oil and your favourite spices (salt and pepper are a good start; rosemary is always nice) and toss the vegetables until they are nicely coated with the oil and seasonings.
  6. Roast the vegetables for 50 to 60 minutes at 400 degrees F. You can lower the oven temp to 375 and cook the veg a bit longer. I like to do this if I am cooking something else at the same time - like the chicken breasts. It is a good idea to stir or turn the vegetables a few times while they are cooking.
  7. Eat your vegetables.


Saturday, 19 January 2013

Sloppy Chicken with Greens and Noodles

Sloppy Chicken with Greens and Noodles on a plate (good in a bowl, too)

This dish brings a healthy twist to classic sloppy joes. First, we change out the ground beef for ground chicken (ground turkey is good, too), throw in the nutritional punch of Swiss Chard (or kale, fresh or frozen) and substitute the usual white bread hamburger bun with gluten-free, fat-free, low carb kelp noodles.

The original version of this recipe was one I found on the "free" rack at a health food store last summer. I've made it several times and have tweaked it a bit since then. You will likely find yourself at the health food store to get the kelp noodles. The noodles are made of kelp - which is a sea vegetable known as rich source of trace minerals including iodine; sodium alginate - which is a salt extracted from a brown seaweed; and water. The noodles have a neutral taste and a texture that makes them a tasty, healthful alternative to pasta and rice noodles. And, get this ... no cooking required. Just rinse and add the noodles to any dish - salads, stir-fries, broths, casseroles. The Bragg's soy aminos (aka liquid soy seasoning) is also from the health food store. You can read conflicting opinions on the internet about the relative healthiness of this product. For the purpose of this recipe, you can substitute soy sauce or tamari sauce. They are all made from soybeans and are all salty.

While some of the ingredients may seem a tad exotic for the average kitchen, I urge you to give this recipe a try. It's relatively quick to prepare and has already become a favourite at our house.

MA's Sloppy Chicken with Greens and Noodles

What you'll need to make this Sloppy Chicken  

3 tbsp olive oil, divided into 2 tbsp and 1 tbsp
1 lb ground chicken (or ground turkey)
2 cloves garlic, minced
1 onion, thinly sliced
2 cups Swiss Chard or kale, sliced into strips
1 - 5 ½ oz can tomato paste
2 ½ cups vegetable stock
¼ cup apple cider vinegar
1 - 1 gram packet stevia
2 tbsp Braggs soy aminos (or tamari or soy sauce)
2 tsp Dijon mustard
1 tsp chili powder
1 - 1 lb package kelp noodles

Crumble meat easily with this tool from Pampered Chef
In a large frying pan or wok, heat 2 tbsp olive oil.

Add ground meat and sauté for 8 to 10 minutes or until meat is cooked through. Drain fat and remove ground meat from pan.


Stir in kelp noodles
Add remaining 1 tbsp olive oil to pan on medium heat.

Add garlic and sauté for 1 minute.

Add onion and sauté, stirring occasionally, for about 5 minutes or until the onion is softened.

Add greens and sauté for about 5 minutes, stirring often.

Stir in tomato paste, stock, vinegar, stevia, soy aminos and mustard. Simmer for 10 minutes.

Add chili powder and meat to the mixture. 
Simmer for 5 minutes.

Stir in kelp noodles. Heat until warmed through.

Serve and enjoy.


Printable Recipe for MA's Sloppy Chicken with Greens and Noodles


Tuesday, 15 January 2013

Harry's Cheeks in Caps

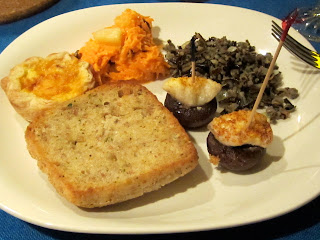
Pickerel cheek in mushroom cap: ready to pop into your mouth

I love feeding people so I was more than happy to welcome our friend Harry over for supper, especially when he wanted to do some of the cooking. When I found out that he was going to make pickerel cheeks, well, that was extra special.

Pickerel cheeks are a bit of a delicacy. They are literally the cheeks of the pickerel - one of the most popular fish with anglers and commercial fishermen where I live in Manitoba. (Pickerel are also known as walleye in some parts of the world.) These cheeky morsels have been compared to scallops, but I think the cheeks are more tender. The trick to making this recipe might be in actually procuring the pickerel cheeks. Unless you catch a lot of pickerel yourself or have the pleasure of knowing someone who does, you’ll have to look for a commercial source. I found one source online selling two 2 ½ pound bags for $109.00 (!) and a few ads on Kijiji for a more reasonable $10 a pound. However you get them, pickerel cheeks are a tasty treat.

Harry served the cheeks and caps with ciabatta buns spread with garlic butter then lightly toasted. Of course, they would make a great appetizer, but we had them as part of dinner and rounded out the menu with a side of herbed wild rice, bacon cheddar tarts, and Barefoot carrot salad. It was a feast.

And now, with Harry’s kind permission, here’s the recipe for his pickerel cheeks and caps.

Harry’s Pickerel Cheeks in Caps

 
Harry places cheeks on caps
  Preheat oven to 400º F.

  ½ lb pickerel cheeks, fresh or thawed

  24 good-sized mushrooms, stems removed
  (Harry used brown   mushrooms)

  ¼ lb garlic butter, purchased or homemade

  Parmesan cheese

  Paprika

  In mini-muffin tins, place mushroom caps bottoms up.

  In each mushroom cap, place about a ½ tsp garlic butter
  covered with a single pickerel cheek.

  Over each and every stuffed mushroom, liberally sprinkle
  Parmesan cheese and paprika.

Pile on the Parm and paprika
  Bake for 15 to 20 minutes or until cheeks are cooked through and
  everything is nicely browned.


Our feast!


Sunday, 13 January 2013

Beery Pork Stew

Beery Pork Stew

There was a very good buy on whole boneless pork loins at the grocery store recently. We bought two. If you do this, you’ll want to cut the pork loins into a few more usable cuts and freeze them for future use. If you’ve never carved up a pork loin before, Doctor BBQ has a great video on Youtube that shows you exactly how to do this.  Give it a try. It doesn’t take long. It’s not hard to do. And you’ll save yourself some money.

After playing butcher shop, stocking up the freezer and feeling pretty proud of myself, I looked for something to do with some of the smaller pieces of pork. I came across several stew recipes that called for beer. We always have a beer around, so I combined a few recipes and put together this beery pork stew using what was on hand. The beer was a lager, which explains the mostly beige pallor of the stew. Nevertheless, it tasted great - no beery aftertaste. I highly recommend serving it with some pumpernickel bread and butter (and your favorite beer if you are so inclined). It also reheats well for lunch the next day.

MA’s Beery Pork Stew

Ready to make beery pork stew
2 lbs pork loin, cut into bite-sized pieces
¼ cup flour
¼ tsp salt
¼ tsp freshly ground pepper
1 tsp bacon fat or oil
1 to 1 ½ cups onions, chopped
1 or 2 cloves garlic, minced
3 ribs celery, chopped
4 potatoes, peeled and cut into chunks
2 or 3 carrots, peeled and cut into chunks
½ tsp caraway seeds
1 bay leaf
1 cup chicken or turkey stock
1 10-12 oz bottle beer
2 tbsp apple cider vinegar
2 tbsp brown sugar

In a bowl, mix together flour, salt and pepper. Add pork to bowl and coat well with flour mixture.

In a large saucepan or Dutch oven, heat fat or oil over medium-high heat. Add pork and cook until evenly browned.

Add onions and garlic. Cook until softened, about 5 minutes.

Add remaining ingredients to pan and stir with love.

Bring to a boil.

Cover and reduce heat to a simmer. Cook, stirring occasionally, for 1 to 1 ½ hours or until the pork is tender.

Makes 6 servings.

Printable Recipe for MA's Beery Pork Stew

Friday, 11 January 2013

Banana Love: Earthquake Banana Cream Pie


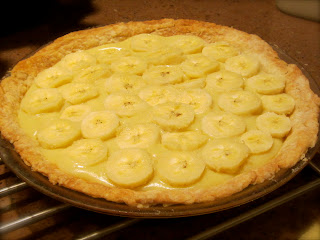
Earthquake Banana Cream Pie

My love affair with bananas continues in this very excellent banana cream pie.

I found the basis for this recipe online six or seven years ago. The recipe's contributor noted that their father had made this pie from scratch in his restaurant for over forty years and the pie was always a favorite. Unfortunately, I don't know more about the restaurant and can't pass on the credit. I’ve rewritten the recipe here with minor changes and when you taste it, you'll see why it was such a favorite.

To start, you’ll need a baked pie shell. You can make one using my flaky lardy piecrust recipe or whatever piecrust you like as long as it’s already baked and cooled before the filling goes in. By the way, don’t worry if your homemade crust has a few uneven edges as mine does in the photo below. Whipped cream at serving time is the perfect cover up. The pre-formed graham crust you can buy at the grocery store is also delicious in this recipe. If you use a crust that is less than 10 inches in diameter, you will have leftover filling. Put it into ramekins and enjoy a tasty little pudding dessert.

You can use whatever milk you like to make the filling. I use skim and it works just fine. However, this is one place where you will not want to use overripe bananas. Save the mushy bananas for another recipe (like blender banana cake) and use slices of the firm ones here. Because of the custard filling and the bananas, this pie is not a good keeper. Plan to have it eaten within a day or two of making it otherwise the moisture of the custard will soften the crust. 

And what about the earthquake? Occasionally, the custard filling doesn’t set as firmly as you would like. The pie will still look smooth and firm until you cut the first slice - then suddenly cracks form along the top (you can see it in the photo at the top of this post). This happened as I was serving a slice to my friend Harry. He looked at the cracks and dubbed it earthquake pie. If I'd had an extra banana, I might have covered the top of the pie with banana slices to disguise the earthquake effect. Two pieces of pie later, the seismic custard proved the old adage: it's what's inside that counts!

MA’s Earthquake Banana Cream Pie

Ingredients for filling

10” baked pie shell, cooled
4 cups cold milk
8 tbsp cornstarch
1 ¼ cups sugar
1 pinch salt
4 eggs, slightly beaten
2 tbsp butter
2 tsp vanilla
2 bananas, sliced

In a medium-sized saucepan, pour cold milk.

Mix together cornstarch, sugar and salt. Add the mixture to the cold milk, stirring until all the dry ingredients are dissolved in the milk.

Cook mixture over medium heat. Stir constantly until bubbly.


Cooking the custard
Pour ¼ of the hot mixture into beaten eggs and mix thoroughly. Return egg/milk mixture to saucepan.

Continue cooking until the mixture comes back to bubbling and is thick.

MA’s Tip: If you see little brown flecks floating up, the milk and sugar have begun to scorch. Don’t panic. Try not to stir right down to the bottom of the saucepan. Turn down the heat and/or remove the saucepan for a minute or two.

Blend butter and vanilla into mixture.


Banana slices form centre layer
Pour about half the mixture into the pie shell and cover with banana slices.

Pour remaining mixture on top of the banana slices. Any leftover pie filling can be put into custard cups and served as a dessert.

Let the filling cool, then refrigerate until firm.
Top with sweetened whipped cream and serve.

If you won’t be serving the whole pie at one sitting, I recommend adding the whipped cream to each individual slice as it is served.

Printable Recipe for MA's Earthquake Banana Cream Pie
Ready for the whipped cream


Wednesday, 9 January 2013

Lard in my Pie


Baked Unfilled Piecrust 
This post began simply enough. I wanted to share my go-to recipe for pie dough – the one I’ve used most consistently and with the best results for over thirty years. My recipe uses lard and that’s where I got a little bogged down.

I know using lard in cooking is a touchy subject. It’s a fat and that always seems to get people talking. In my experience, popular attitudes toward fat in our diet change with every study released and that can get confusing. Over time, it's hard to decipher what's good for you and what's not. I always try to consider the source and remind myself that on some level everybody is trying to sell something.

If you take a spin around the Internet (which is where I really got bogged down), you’ll find a myriad of opinions and some interesting information about lard. For instance:
  • Where there are pigs, there is lard. In cultures where pork is part of the diet, lard is used in cooking. Since it's made of pork fat, it's a waste not, want not scenario.
  • Lard has less saturated fat, more unsaturated fat and less cholesterol than butter. And unlike most vegetable shortenings, unhydrogenated lard contains no trans fat and is a rich dietary source of vitamin D.
  • You can make lard in your own kitchen. I will be giving that a try soon.
  • A concise and informative article on many aspects of lard can be found at blackbookcooking.com
All I really know for sure is that lard makes the flakiest piecrust. I have made this recipe using vegetable shortening instead of lard and it's quite edible, but you won't get the same flakey crust. Primarily, I use Tenderflake Lard made by Maple Leaf Foods. It is non-hydrogenated but does contain two preservatives, BHA and BHT. That’s another reason I will try rendering my own pork fat to eliminate these two possible carcinogens. I’m also looking into finding locally produced lard that’s made without additives. Until then, I'll continue to take my chances. I’ll stick with Tenderflake and this recipe, which is basically the one you can find right on the box. It makes enough for six 9" pie shells or three double crust pies.


MA's Flaky Lardy Piecrust
Dry ingredients and lard blended to large crumbs

5 ½ cups all-purpose flour
2 tsp salt
1 lb lard
1 tbsp white vinegar
1 egg, lightly beaten
Cold water

In a large bowl, mix together the flour and salt.

Using a pastry blender or two knives, cut the lard into the flour and salt until the mixture turns into large crumbs.


Mix egg, vinegar and water to make one cup

In a one-cup measure, combine the vinegar and egg. Add cold water to make one cup. 


Using a fork, gradually stir the egg-water liquid into the dry mixture. Use only enough water to make the dough cling together. Too much liquid will toughen the crust.


Gather the dough into a ball. Divide into six portions.

Divide dough into 6 portions
On a lightly floured surface, form one of the portions of the dough into a round flattened disc. Using your rolling pin, roll out into circle. If the dough is sticking, chill it for an hour or two.

Place the dough in the pie plate. You can move the dough to the pie plate, by wrapping it loosely around the rolling pin and then unwrapping it over the pie plate. Alternately, if you have rolled the dough on a piece of wax paper, you can lift the paper and flip the rolled dough into the pie plate. This is my preferred method.


For future use, pie dough can be kept refrigerated or frozen. 


Dough for today and dough for future
  • Refrigerated dough should be wrapped well. My method is to wrap a disc of dough – enough for one pie shell – in a piece of wax paper and overwrap this tightly with plastic wrap or foil or place several wax paper wrapped discs into a plastic freezer bag. When it’s baking time, I just roll the dough out on the wax paper it was wrapped in. 
  • Refrigerated dough will keep well for about one week. Take it out of the fridge about 15 minutes before you want to use it so it will be supple enough to roll out. 
  • Frozen dough can be stored as an unbaked disc, rolled out dough or as a baked or unbaked pie. It should be wrapped well before freezing. Frozen dough will keep in the freezer for about 5 months.
  • Defrost the dough at room temperature before baking; making sure it is pliable before working with it. 

Printable Recipe for MA's Flaky Lardy Piecrust


Saturday, 5 January 2013

Feta not Chedda Scalloped Potatoes


Scalloped Potatoes with Feta


I like goat milk feta. In fact, I like it so much that I buy a big container of it so I will always have it on hand to put into a salad or top a pizza. Not long ago I tried using feta instead of cheddar in scalloped potatoes. The result was a creamy and salty and oh so good casserole. In fact, I may not go back to cheddar.

After checking out some scalloped potato recipes online and in my cookbooks, I put together this recipe. I used Russet potatoes because that’s what was in the pantry, but I think any potatoes would work well. I boiled them for fifteen minutes and then sliced them. This helped ensure that I wouldn’t find a partly cooked potato slice in the finished casserole and it cut down on the time the casserole had to spend in the oven. Then I made a basic white sauce with onion, garlic and some Greek-style spices, and layered the whole thing together with feta cheese.

We had the potatoes with some Italian sausages and steamed vegetables. We were really happy to have some leftover for the next day. I look forward to making these again, really soon.


MA's Scalloped Potatoes with Feta

Slice pre-cooked potatoes
Preheat oven to 375° F.

6 fist-sized potatoes, well scrubbed
4 tbsp butter
1 onion, finely chopped
2 cloves garlic, minced
4 tbsp flour
½ tsp each basil, rosemary, and oregano or 1 ½ tsp Greek spice mix
2 cups milk
1 cup feta cheese


Layer potatoes, feta and sauce
Boil potatoes for about 15 minutes. This reduces cooking time for the dish and helps ensure potatoes are evenly cooked.

Drain potatoes and cool them enough to handle them comfortably. Cut potatoes into thin slices.

Melt butter in saucepan. Sauté onion and garlic in butter until softened. Add flour and spices to butter, onion and garlic and stir until well mixed.

Gradually add milk to flour mixture, stirring constantly until the mixture thickens into a sauce.

In a lightly buttered 2 ½ quart casserole dish, layer potato slices, feta cheese, and sauce until dish is filled. Crumble some feta on top.
Ready to serve

Bake for 30 to 35 minutes.

Makes 4 to 6 servings.

Printable Recipe for MA's Feta Scalloped Potatoes


Thursday, 3 January 2013

A Turkey's Second Life


Turkey Noodle Soup


Whether your turkey began as the featured entrée for Thanksgiving or Christmas or a special meal request from your favourite birthday girl or boy, it can have a great second life when you turn it into stock and then into soup.

And why, you ask, would you want to take the time to make your own turkey stock? First, I am not aware of any commercially available turkey stock (although commercially prepared chicken stock is a great substitute). Second, it’ll make you feel down-to-the-bone good about using up every last scrap of the bird. Then, there is the healthy benefit of being able to control what’s in the stock. For me, I just love how the aroma of the simmering stock fills up the house. And, of course, there’s the delicious turkey noodle soup you can make with the stock.

This is a very basic stock. You can apply the same technique to make stock from a leftover chicken carcass. Here are a few tips for the novice stock makers out there.

Wednesday, 2 January 2013

A New Year Begins

I started this blog in November. The big thing with blogs, I was told, was keeping with it. Twenty-four posts later I am still very into it. It's been a good fit for me as a home cook and a writer. Granted, there aren't too many folks reading the blog at this time, but the feedback I have received is positive. I have even had some compliments on my photography, which I had been so worried about. All in all, I am encouraged and I am enjoying every step of the blogging process.

If you're reading this, I thank you. I hope you like what I am doing enough to become a follower  by subscribing to the email updates so we can keep in touch on a regular basis. I hope you will try a recipe or two and leave a comment to let me know how it worked in your kitchen - be it good or not-so-good. And, I hope you will send me any suggestions of what you would like to see featured in upcoming posts.

My resolution for 2013 is to continue MA in the Kitchen and through it to continue learning, to become a better blogger and to share my passion for cooking with you.

Happy New Year, dear readers.